Archive for Crafts

Crafting Time at Camp Grandma’s

It’s Summertime here at Camp Grandma and we’ve had a few crafty adventures over the past few weeks I thought I would share today.  We’ve been painting, coloring, blowing  up lots of balloons, squeezing in some swimming, and eating lots of popsicles and snow cones.  It’s been hot and humid here recently, and we all know how popsicles can cool the soul!

The first thing I did to make Camp Grandma a little special this year was I made a box, and each week when the Grand-kiddies come over (they are with me on Thursday’s and Friday’s) there’s some sort of crafty surprise or something fun to-do in that box.  This has been a fun way to start the day, as the kids look forward to finding out what’s in their special box.

IMG_1981-001

The first week the box contained paper plates, balloons, big crafting sticks, and some duct tape.  We used the contents that week to make and play Balloon Pong – which I had read about at Grandma’s Briefs.  I will admit that the grand-kiddies had fun blowing up all the balloons, but they had even more fun ping-ponging the balloons around.  They didn’t have a lot of success hitting the balloons to one another, so Evan made a contest of seeing how many times he could “pong” the balloon before it hit the ground.

2015-06-11 11.08.32

2015-06-11 11.08.33

The next week at Camp I had put balloons, colored paper, scissors, tape, and the pattern to make balloon feet.    We were making balloon people.  They were so cute.  Madison really enjoyed telling me what she wanted me to draw on her balloon. Evan made his into a group of the Avengers, which I did not get a picture of.  Boo on Grandma. This crafty project was discovered by yours truly at Grandma’s Ideas.  The balloon crafts have been really fun, and just plain blowing up the balloons and using them like volleyballs around the house was a great activity too.

IMG_0379

IMG_0381

IMG_0386

For two of our weeks together we have done some painting.  We used tempera paints, sponges brushes, sponges, and I splurged on some thick watercolor paper for my little artists.  This is really the first time I’ve had a chance to paint with Madison.  She loved putting the colors on paper and painting with everyone’s favorite colors.  Madison’s favorite color is pink, and she know mine is purple.  She’s always telling anyone who will listen that her Grandma’s favorite color is purple.  Evan had fun being a mixologist, and discovering what colors he needed to mix to make other colors.  He had a lot of fun being the paint scientist.

IMG_0365

IMG_0369

IMG_0375

I am blessed to be able to have some special time with my grand-kids each week right now.  This time together creates memories that will last for a long, long time.  As they start to get a little older and as they move on to do their own independent activities, it will be good to know that we’ve had this time with each other.

Have you spent time with your grand-kiddies recently?  Did you get in any crafting time with them?  I’d love to hear what you’ve been up to this summer.

Birthday in a Box

My nephew lives a few hours from us and we do not get to see him very often. For his birthday last month I wanted to send him something a little different to celebrate.  I combed through quite a few Pinterest pictures and found this adorable birthday box idea.  I decided this would be the perfect gift for a long distance family member, and set out to make one myself.

First I gathered my supplies:

  • An empty shoe box.  The shoe box had the lid attached so it made my gift box decorating all the easier.  I did not have to do any finagling to hinge the lid together.
  • Scrapbooking paper with a birthday theme.
  • Glue – I used tacky glue and my crafters’ tape.
  • Mod Podge.
  • Sponge brushes for the Mod Podge.
  • Washi tape.
  • A paper-cutter.
  • Brightly colored crochet thread.
  • A set of free printables that I found with a Pinterest link at 100directions.com.  The printables were really the thing that inspired me to get going and create my box.  they are adorable.


IMG_0101IMG_0100IMG_0103

 Next I planned the paper placement and cutting, and the placement for the printables for my box of fun.

  • I cut the paper pieces for the inside of the top of the box first and glued them in place.  Then I added the trim pieces to embellish the edges.

  • Then I cut the paper pieces for the bottom of the box and the sides on the inside and glued them in place.

  • On the top of the outside of the box I cut squares to make a little patchwork look.  I used a colorful scrapbooking paper here and some plain brown crafting paper.

  • Then I embellished the top of the box with the printables, and washi tape.
  • The washi tape really helped to make the edges looked finished, and like they had a uniform border.

IMG_0111-001

  • On the sides of the outside of the box I used the same paper that matched the paper that had been used on the lid.

Decorating for the inside of the lid was quite fun.

  • I cut the pieces out for the banner, and then punched holes in the corners of each piece so they could be strung together.

IMG_0107

  • I used some brightly colored cotton crocheting thread to string the banner inside of the box.
  • Then I added the embellishments to complete my “Happy Birthday” message.

IMG_0114IMG_0115

When I was done decorating the entire box I painted a thin coating of Mod Podge over the top of the outside of the box to keep all of the paper in place and give it a box a bit of a glossy sheen.

IMG_0117-002 IMG_0118-002

Now for the contents of the box I wanted to do something fun for the birthday boy.

  • I baked a little lemon cake.
  • Sent a can of frosting with sprinkles, and a couple of plastic knives for him to decorate the cake and share with his friends.
  • Sent some birthday plates, spoons, and napkins.
  • Added some candy – M&M’s and Cracker Jacks
  • Threw in some party decorations, and he was all set to celebrate.

IMG_0127

IMG_0126

 IMG_0129

IMG_0137

This project was a ton of fun.  I would do this again in a heartbeat.  You can change the contents so easily to give any sort of themed gift; baseball, a night at the movies, favorite coffee’s.  The possibilities are endless.  I’ll be confiscating shoe boxes from all of my family members from now on to build up  crafting/gifting supply.

This post linked to the GRAND Social

My Patriotic Tablecloth-A New Tradition

My dining room table needed a splash of red, white, and blue for the summer holidays.  I had been searching for a tablecloth for a while and could not find anything that I liked.  It took a trip to Hobby Lobby and taking the time to search through their ideas in the store for me to find “The One“.  My old dining room table is very long, can seat up to 10 people comfortably, and needed a big tablecloth.  I finally had a chance to make one this past summer from some colorful bandannas.

First I bought 15 bandannas; 5 red, 5 white, and 5 blue.  Next I washed and dried the bandannas to pre-wash  them just like you would with any new fabric project.

IMG_0176

Next came the task of the pattern of the bandannas.  How did I want to lay them out?  My layout needed to be 3 bandannas wide by 5 bandannas long.   I actually drew up a few ideas on the computer, because I thought I wanted to have them be somewhat abstract, but in some sort of pattern too.  Does that make any sense?

In the end I decided that I would do a row of one color right down the middle.  On my long table this made it appear like a table runner.  And then I alternated the colors on the other two long rows. I laid all of the bandannas out on the floor, and then picked up each row (3 across), pinned them together in the order I would stitch them together, and marked the row number with a post-it-note.

IMG_0179

I did not do a traditional seam for the bandannas  I overlapped the edges about a half-inch and then did a decorative zig-zag stitch that would show on the top of the tablecloth.  First I sewed three of them together, just like the picture shown below. This would create the table width.

IMG_0181

Then once I had all five rows completed, I stitched the rows together, being careful to match the seams of the previously stitched row.  This stitching keeps everything in line, and looks much better on the table too.  This created the length of the tablecloth.  Once all of the stitching was done I washed and dried the tablecloth again the help the squares lay flat and stay in place.  I did have to do a bit of ironing too for all the stitching to lay flat.

IMG_0175

Here is my finished work.  The table did look lovely.  I was quite pleased with the end result.

IMG_0003

This tablecloth will be around for the patriotic holidays (or just all summer long) for many years to come.  It is great that it is completely washable.  When there’s a party at the house I don’t worry about the occasional spill or what not.  I just know that I can toss it in the washer and dryer.  But, it does require a little touch up ironing once it is done in the dryer.  That’s alright with me though, because it is such a wonderful conversation piece.

Now that I have this tablecloth completed I’m thinking I may do the same thing with fall colors, or maybe one that is just Christmas colors. This project was a lot of fun, and did not take long to put together once I decide on the pattern.  I would definitely make another one.

What project are you working on these days?

Will you get hooked on Zpagetti? Crochet Zpagetti Yarn Bag- tried and tested

Check out this great yarn over at thestichsharer.  It looks like a lot of crocheting fun.  Enjoy!

Will you get hooked on Zpagetti? Crochet Zpagetti Yarn Bag- tried and tested.

Oh Christmas Tree, Oh Christmas Tree

1-IMG_0045I promise this will be my last post concerning Christmas trees from the  2012 holiday season.  But I could not share this story with you until all of the gifts had been given.

Many, many moons ago I did some Christmas crafting, and made some ever so cute fabric Christmas trees.  At that moment in time I was a young mom, and would craft my little heart out and sell them at a Christmas boutique every year.  Fun memories.

Over the years I lost my fabric Christmas tree, and had not made any new trees for quite some time.  Then when we were visiting my sister in October, she told me that she had to throw her little tree out because it got moldy.  I was so sad for her I knew exactly what I would give her for Christmas.

I scoured my Babe Cave (aka the sewing room) looking for my old Christmas tree pattern and I could not find it anywhere.  Oh Boo!  So of course I went to JoAnn’s found the pattern (so elated McCall’s still had this pattern), got my supplies, and went home to make trees.  By the way I already had the fabric.  I had purchased it on clearance last Christmas season.

I decided to make one for my sister, one for my brother, and one for myself.  We would all have the same tree from the same fabric.  Kind of cheesy I know, but I’m cheesy and traditional like that.

So here’s how they go together:

The trees are made from a McCall’s Crafts pattern 3777.

2-IMG_0048

For each tree you are making you cut out 6 pieces of the tree pattern.  You can also use contrasting fabrics, so in that case you would cut 3 pieces from each fabric.  I’m going to be making some trees with contrasting fabrics for next Christmas.

3-IMG_0049

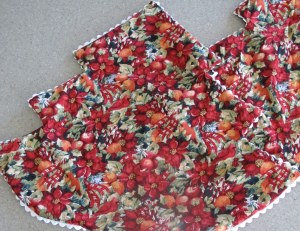
The next step is to baste either rick-rack or some type of lace around the edges.  You baste 1/2″ from the edge.  This step is completed only on 3 pieces of the trees.  Leave the other 3 plain to form the tree sections.

Next, sew two pieces right sides together, and leave an opening on the bottom according to the pattern.  Be sure you have one piece with your trim, and one without.  Trim your seams, and clip the corners and curves.  Turn the pieces right side out and press flat.  You should now have three pieces to stitch together to form your tree.

IMG_0055

Lay two of the sections on top of each other and baste through the center according to the pattern.  The pattern piece has a line for you to trace to follow for this portion of the stitching.  Lay the third piece on top of the two you have previously basted together.  Line up your edges, etc. and pin in place.  Stitch through all three layers.  You should now have six openings in the bottom of the tree. This forms six sections that will be stuffed to form the tree.

1-photo

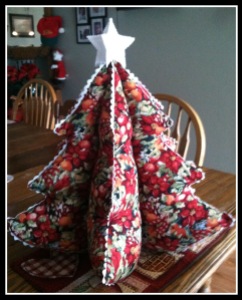
Once you finishing stuffing and plumping your tree, you stitch the openings closed, add a star and voila a nice little tabletop tree for years to come.  The beauty of this pattern is that you can choose very simple or very elegant fabrics.  You could embellish with mini ornaments, or ribbon bows.  The sky is the limit.

And a funny side note to this story-  as I was assembling the trees I was making I started  digging around in one of my little Christmas storage bins.  In the bottom of this bin there were some pattern pieces all folded up nice and neat. I unfolded the pieces and there were some patterns for a few different ornaments.  The last piece I unfolded was my old, old pattern for the fabric Christmas trees I had made so long ago.  I laughed to myself for a few minutes, and got back to my sewing.

I’m thinking next year of making some plaid trees for the younger crowd in the family.   Or maybe polka dot trees for the girls and plaid trees for the boys.  Time will tell, we’ll have to wait and see.  If you like to sew, and are a crafter at heart give this pattern a try.  It’s a lot of fun.

  • Subscribe to Blog via Email

    Enter your email address to subscribe to this blog and receive notifications of new posts by email.

    Join 1,175 other subscribers

Skip to toolbar