Archive for Recipes

Frozen Apples for your Pie?

We have a tiny little apple tree in our backyard.  It’s a golden delicious apple tree, but I think we’ve always picked the apples when they are still green.  This little tree is about 7 years old, and last fall was the first year that we have picked a plethora of apples from our little tree.

madison_apples_2015

We picked all of the apples at one time because we have some lovely neighborhood crows who like to pick the apples for us if we give them the chance.  Since we had a crate full of apples they were not going to go to waste.  I looked online at recipes and ideas for processing the apples and decided to freeze them.  And I also decided that they would be made into apple pie filling based on my googling, researching, and reading.

The recipe I found was talleyfarmsfreshharvest.com.  I was looking for a simple recipe that would be quick and easy to put together.  And for my apples I only used 1/2 of the sugar called for, wanting to keep the sweetness to a minimum.  I made a single batch of “pie filling”  each time I was processing the apples.  This just made it easier to keep track of the amount of apples I was peeling, and then mixing in the ingredients after the peeling process.  A certain Travel Man in know was very excited about the prospect of having multiple apple pies at the ready to be baked for desserts when he is home between assignments.

This is  the typical amount of apples that I put in a ziploc bag and then in the freezer.

2015-10-08 15.36.47

 Frozen Apple Pie-

Ingredients: 
  • 10 cups peeled, sliced & cored apples (use an apple peeler to save time)
  • 1/3 cups sugar (or more if very tart)
  • 1 Tablespoon flour
  • ½ teaspoon salt
  • 1 Tablespoon lemon juice
  • ¼ teaspoon nutmeg
  • ½ teaspoon cinnamon (slightly heaping)
Directions: 
  • Put in the peeled apples in a large bowl, and add the remaining ingredients.
  • Toss to cover all the apples. 
  • Put in a one gallon freezer bag making sure to scrape the bowl.
  • Flatten bag and freeze. 
  • When ready to make a pie, no need to thaw, just pull bag out. 
  • Make your crust and empty the bag in the crust, flattening to fit.
  • Bake at 425 degree F for 45-55 minutes.

The pie will look like this before you put it in the oven.

2015-10-08 15.37.09

2015-10-08 15.39.35

Then once your baking is complete you will have this lovely dessert.

2015-10-08 16.33.21

If you enjoy apple pie this is a super simple dessert you can throw together in a jiffy.  Oh and don’t forget to add the whip cream or ice cream, and enjoy!


Luscious Lemon Squares

Since it’s January, and my lemon tree is over loaded with lemons, it’s about time I share a lemony, delicious recipe with you.  Lemon squares are one of my Mom’s favorite desserts. She’s been asking me when we’re going baking these yummy little goodies.  I think it’s high time we gather some lemons and get to work.

2016-01-21 13.58.25

This is my favorite recipe for lemon squares from The Betty Crocker Ultimate Cookie Book.  I think I got this book from my Mom a few years ago.  Thanks Mom!

05-IMG_0026-001

Ingredients:

  • 1 cup all-purpose flour
  • ½ cup butter, softened
  • ¼ cup powdered sugar
  • 1 cup sugar
  • 2 tablespoons lemon juice
  • 2 teaspoons grated lemon peel
  • ½ teaspoon baking powder
  • ¼ teaspoon salt
  • 2 eggs

Directions:

  • Pre-heat oven to 350°.
  • Mix flour, butter and powered sugar.
  • Press into ungreased square pan 8x8x2 or 9x9x2, building up a ½ edge to form a small crust.
  • 01-IMG_0022-001
  • Bake for 20 minutes or until golden brown.
  • Beat the remaining ingredients together on high-speed until light and fluffy.
  • Pour this mixture over the baked layer, and bake again for 25-30 minutes.
  • There should be almost no indentation remaining when lightly touched in the center.  A thin crust will form over the top of the bars.
  • 06-IMG_0027-001
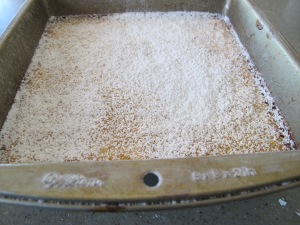
  • While the pan is still warm sprinkle the top with powdered sugar.

09-IMG_0030-001

  • Cool the pan completely, and then sprinkle with a second layer of powdered sugar.

12-IMG_0033-001

I cut the 8×8 size pan into small little squares, and remember the lemon flavor gets better with age.  If you can stand to let these little beauties sit around for a few days they taste better and better each day.  This batch was particularly yummy, and the lemony middle just melted in your mouth.  I have to admit they did not last long, and I made a second batch a few days later.

My next lemony adventure will most likely be a lemony sorbet, lemon poppy seed cake, or maybe a lemon-ricotta cheesecake.  Looking forward to trying the cheesecake this weekend.  Happy baking everyone.  What’s your favorite lemony recipe?

We’ve Been on a Cheesecake Kick

The birthday cakes for three of our families’ 2015 birthday celebrations have all been cheesecakes.  We’ve had a couple of the Snickerdoodle variety, and then one Lemon Ricotta cheesecake.  The birthday peeps in my family have been on a cheesecake quest, and we have had some great results.

For my oldest son’s birthday this past December he had requested a Snicker Doodle cheesecake.  We found a recipe on Pinterest that sounded good, and it turned out fantastic!   We topped this cheesecake off with some Cinnamon Whipped Cream. Ooh, la, la.

IMG_1665

Then for the January/February birthdays we had a Snicker Doodle repeat because my Mom had not been at the party when the first one was created.  Once again, fantastic flavor great recipe.  I highly recommend it if you’re a cheesecake, snicker doodle, or cinnamon lover, or a lover of all three!

SnickerDoodle Cheesecake Recipe-

Source: Better Homes and Gardens

Makes 12-16 servings (depending on how you slice it)

Ingredients:
  • 1 10-ounce package shortbread cookies, finely crushed
  • 1 tablespoon sugar
  • ¼ cup butter, melted
  • (2), 8-ounce packages cream cheese, softened
  • 3 eggs
  • 8-ounce carton sour cream
  • 1 cup sugar
  • 2 tablespoons all-purpose flour
  • 2 teaspoons vanilla
  • 1 teaspoon ground cinnamon
  • 1 tablespoon sugar
Directions:
  1. Allow cream cheese and eggs to stand at room temperature for 30 minutes. Meanwhile, preheat oven to 350°F.
  2. For crust, in a medium bowl stir together crushed cookies and 1 tablespoon sugar. Stir in melted butter until combined. Press mixture onto the bottom and 1½ inches up the sides of a 9-inch springform pan; set aside.
  3. For Filling– In a large mixing bowl, beat cream cheese, sour cream, the 1 cup sugar, the flour, vanilla and ½ teaspoon of the cinnamon with an electric mixer on medium to high-speed until smooth. Using a fork, lightly beat eggs. Stir eggs into the cream cheese mixture.
  4. In a small bowl, stir together the 1 tablespoon sugar and the remaining ½ teaspoon cinnamon. Pour cream cheese mixture into crust-lined pan, spreading evenly. Sprinkle with sugar-cinnamon mixture. Place spring-form pan in a shallow baking pan.
  5. Bake for 40 to 50 minutes or until a 2½-inch area around outside edge appears set when gently shaken. Cool in spring-form pan on a wire rack for 15 minutes.
  6. Using a small sharp knife, loosen crust from sides of pan. Cool for 30 minutes more. Remove the sides of pan; cool cheesecake completely on wire rack. Cover and chill for at least 4 hours or overnight before serving.
  7. To Store: Place cheesecake in an airtight container; cover. Store in the refrigerator for up to 5 days.


For our March birthday celebration I baked a Lemon Ricotta cheesecake for my daughter Hilary’s birthday.  I’m pretty sure Hilary and I also found this recipe on Pinterest.  It was a luscious, lemony, delight and we would definitely repeat this recipe.  The zesty lemon flavor was just amazing.  It is an extremely rich and decadent dessert.

IMG_0337

Lemon Ricotta Cheesecake Recipe-

Source: Bettycrocker.com

Makes 12 -16 servings (depends on how you slice it)

Ingredients:

  • 1 10-ounce package shortbread cookies, finely crushed
  • 1 tablespoon sugar
  • ¼ cup butter, melted
  • (2) 8 oz. packages cream cheese, softened
  • 1-¼ cups sugar
  • 2-3 tablespoons grated lemon peel (1 large)
  • 2 tablespoons fresh lemon juice
  • 1 (15oz) container whole-milk ricotta cheese
  • 3 eggs

Garnish: (optional)

  • ½ cup whipping cream
  • 16 candied lemons

Directions:

  1. Allow cream cheese and eggs to stand at room temperature for 30 minutes. Meanwhile, preheat oven to 325°F.
  2. For crust, in a medium bowl stir together crushed cookies and 1 tablespoon sugar. Stir in melted butter until combined. Press mixture onto the bottom and 1½ inches up the sides of a 9-inch spring-form pan; set aside.
  3. For filling, beat cream cheese in a large bowl on medium speed until fluffy.  Add the sugar; beat until very soft and creamy.  Add lemon peel and lemon juice; mix well.  Beat in ricotta cheese.  Be sure you are using the whole milk ricotta for that extra special touch of decadence!
  4. Add the eggs, on at a time, beating just until combined and scraping down sides of bowl after each addition. Pour mixture into the crust-lined pan.
  5. Bake for 70-80 minutes or until sides of cheesecake are set and puffed, but center still moves slightly when pan is tapped.
  6. Cool cheesecake in pan on wire rack for 1 hour.  Cover and refrigerate at least 3 hours or overnight before serving.
  7. Garnish with whipped cream and candied lemons, if you wish.

What cheesecake will we be making next?  I am not really certain, but 2015 could definitely be proclaimed as “The Year of the Cheesecake” here at The Party House.  And by the way the serving of these cheesecakes for our crowd lasted approximately 2.3 minutes.  I’m pretty sure at each birthday celebration within 5 minutes of serving, all of the cheesecakes were devoured.  Let me know what your favorite cheesecake flavor is. Enjoy, I’d love to hear some new thoughts and ideas.


This post linked to the GRAND Social

Birthday Raspberry Cheesecake

2014-02-28 15.10.14
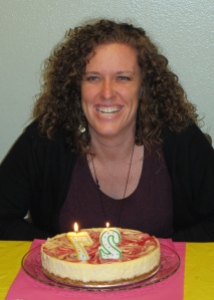
We had THE best raspberry cheesecake last month. My daughter, Hilary requested a cheesecake for her birthday celebration. Yes, I still take special requests for cakes, etc. on the birthday persons special day. More importantly Hilary asked if the cheesecake could be swirled with a raspberry sauce.

So being the dutiful mother that I am I went on an internet quest to find a great recipe that included raspberry sauce. The recipe for the raspberry cheesecake that I chose is posted at Just a Pinch Recipes.

This was the first time that I had made cheesecake with a homemade sauce to go along with it. The results were fantastic and there were raves and compliments all around the room. The cheesecake disappeared in a flash. If you want to try this cheesecake on your own here’s what you need to do.

Ingredients-

Crust:

1 cup graham cracker crumbs (about 1 package, finely ground in a food processor)

2 Tbsp. unsalted butter, melted

2 Tbsp. sugar

Raspberry Sauce:

2 Tbsp. sugar

6 oz. fresh raspberries

Filling:

32 oz. cream cheese, room temperature

1-1/2 cups sugar

pinch of salt

1 tsp. pure vanilla extract

4 large eggs, room temperature

Topping:

6 oz. fresh raspberries, for topping (optional)

powdered sugar, for dusting (optional

Directions:
1. Preheat oven to 350 F. Wrap exterior of a 9-inch springform pan (including base) in a double layer of foil; set aside.

2. Stir together cracker crumbs, melted butter, and 2 tablespoons sugar in a medium bowl. Press crumb mixture firmly onto bottom of pan.

3. Bake until set, about 10 minutes. Let cool in pan on a wire rack. Reduce oven temperature to 325 F.

4. While the crust is baking you can get started on your raspberry sauce. Process raspberries in a food processor until smooth, about 30 seconds. Pass puree through a fine sieve into a small bowl; discard solids. Whisk in 2 tablespoons sugar, and set aside.

5. Put the cream cheese in the bowl of an electric mixer fitted with the paddle attachment; mix on medium speed until fluffy, about 3 minutes.

6. With mixer on low-speed, add remaining 1-1/2 cups sugar in a slow, steady stream. Add salt and vanilla; mix until well combined.

7. Add eggs, one at a time, mixing each until just combined (do not over mix). Pour cream cheese filling over crust.

8. Drop raspberry sauce by the teaspoon on top. With a wooden skewer or toothpick, swirl sauce into filling. Keep swirling until you get a pattern/design that you are pleased with.

9. Bake the cake until it is set but still slightly wobbly in center, 60 to 65 minutes. (The recipe on Just a Pinch calls for the cake pan to be set in water for baking. I did not do this.)

10. Transfer cake pan to rack; let cake cool completely. Refrigerate, uncovered, 6 hours or overnight. Before unmolding, run a knife around edge of cake.

This recipe makes (1)  9-inch round cheesecake. You can garnish with fresh raspberries around the top of the cake if you like.

IMG_0023-002If you’ve never made a homemade cheesecake this recipe can seem a little daunting at first.  But just get busy and have fun making a delicious dessert.  My birthday girl was extremely happy with the results, and I’m sure this cheesecake will make an appearance at one of our family parties again very soon.

Pistachio Pudding Cake

In honor of St. Patrick’s Day here’s a great dessert you can whip up for the cake lovers in your family.  I posted this recipe last summer, and thought this would be a great time to share it again.

This cake recipe is a yummy little recipe that my Mom has made for me over the years for my birthday.  It’s one of the top 5 moist cakes around.  I imagine that you could use other flavors of cake mix and pudding mix to change it up, but my favorite has always been the pistachio flavor.  Not everyone loves the pistachio flavor like I do, but I have to say everyone at my house tried it and liked it.

For the Cake:

  • 1 box pineapple or lemon flavored cake mix
  • 1 30z box of pistachio instant pudding
  • 4 eggs
  • ½ c. vegetable oil
  • 1 c. cold water

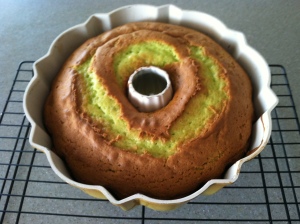
Mix all of the ingredients well  and pour into your favorite angel food or bundt pan.  Grease the pan first.  Bake at 350º for 5o minutes.  Let this cool on a wire rack, and then remove from the pan on to a plate for frosting and serving.  If you have the time,  refrigerate the cake overnight before frosting.  This will keep the cake really, really moist.

Baked Cake – Cooling

For the Frosting:

  • 1 3oz. box of pistachio instant pudding
  • 1 pkg of Dream Whip
  • 1¼ cups of milk

Beat all of the ingredients well.  The frosting mixture should form small peaks, just like a whip cream style frosting.  Frost the cooled cake and refrigerate or serve immediately for your eating pleasure.

And don’t forget the milk or coffee to go along with it. This is a great summer time cake.  The frosting is light, and the cake is moist.  This was a welcome home treat for my Travel Man, and it did not last long.  A great recipe to pass along.  Thanks Mom!

  • Subscribe to Blog via Email

    Enter your email address to subscribe to this blog and receive notifications of new posts by email.

    Join 1,175 other subscribers

Skip to toolbar