Archive for Around the House

The Colors from My Summer Garden

This afternoon I have been working on getting the summer photos organized.  There are just a few that I want to share with all of you from my garden.  Especially since the summer gardening season is winding down for many of us “green thumbs”.

First up – the lovely jalapenos.  Mild and yummy just for me, since I’m a huge “spice weenie”.  I don’t like the heat, just the jalapeno flavor.  I’ve harvested close to 8 dozen of these beauties.  Can’t wait to share my daughter’s roasted salsa recipe with you. 

Next up – the mini pumpkins.  This is a Burpee variety of pumpkin, called Small Sugar.  They can probably be used for pumpkin baking, but for my purposes they will most likely just be decorating the house for fall.

Then there are the sunflowers.  Evan and I had planted the huge, big sunflowers, and right after they bloomed they got attacked by this ugly fungus and I ended up chopping them down.  But they were gorgeous for a little while.

There were also had the small sunflowers, which made a great backdrop in the garden. I had cut some of these and brought them in the house too.  But, they still had so much pollen dropping I only did that once.  They were a little messy, but very sunflower pretty.

Then there was this little sunflower, and I think he was saying, “Do I have to wake up today?”  Kind of funny.

Last flower of the day is the lovely zucchini blossom.  I took a lot of pictures of these blooming, because the flowers are huge.  This is one of my favorites.  I’m still harvesting a few zucchini, and making all kinds of baked goodies from them.

Now I am in the process of planting for a winter crop of cucumbers, sweet corn, spinach and lettuce.  This is the first year I have attempted plantings after the summer harvest.  We are fortunate here in California to have a second growing season, and this  year I will be taking advantage of it.

How did your garden grow this summer?  What is your favorite fruit or veggie from your summer garden?

There’s An Anniversary We Did Forget

Our son, Zachary, turned 21 this past July.  In August,  on the 14th to be exact we should have done the “happy dance” for Zachary and at the very least remembered the date.  August 14th, 2012, was Zach’s 8th Anniversary of cancer survivorship.  He’s a survivor of childhood leukemia (ALL).   I told our family’s story earlier this year in a three-part series, where you can read all the details of our experience.

I woke up this morning feeling a little bummed out that we had forgotten to mark the date this year.  I have never forgotten to celebrate this date since Zach’s chemo ended in 2004.  So, since I have this platform to celebrate my son and his good health, I am.

December 2001 – Zach had been in treatment since April of 2001, and continued his chemo regimen until August of 2004.

Christmas 2001 – Zach’s a trooper!

Turn the clock ahead to 2012-Healthy and strong.

Zach’s 21!!*

Happy 8th Anniversary, Zachary.  Livestrong, Superman.

*Photo credits from the birthday party – Elaine Zee.

Zucchini Pancakes

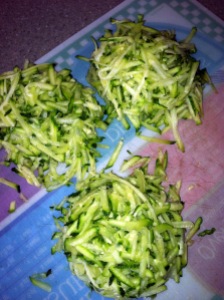
The zucchini harvest here at the Spindle Ranch is going gangbusters.  I had been perusing the allrecipes.com website and came across this recipe for a pancake with a twist.  This was a great breakfast pancake as it has the zucchini, onion, and my favorite, cheddar cheese.  You could add any variation that you please with this recipe.  Maybe add some green onion, or finely chopped jalapenos, or green peppers.  Travel Man suggested this would be a great pancake to eat with a couple of fried eggs on the side.


With your next harvest of zucchini try out this scrumptious recipe.

 Ingredients

  • 2 cups grated zucchini
  • 1 cup shredded Cheddar cheese
  • 1/2 cup grated onion
  • 2 eggs, beaten
  • 1 cup biscuit baking mix (such as Bisquick®)
  • 2 teaspoons vegetable oil, as needed
 

Directions

  1. Mix zucchini, cheddar cheese, and onion together in a bowl.
  2. Stir eggs and biscuit mix into zucchini mixture until well combined.
  3. Heat vegetable oil on the griddle or large skillet over medium heat.
  4. Scoop about 1/4 cup batter onto heated griddle. 
  5. Cook until pancakes are browned, 3 to 4 minutes per side.
  6. Repeat with remaining batter.

I did not take pictures when I made these, so my post is a little barren.  But I wanted to share this recipe with you, because it’s almost like an omelette and biscuit on your plate at the same time.  An easy, simple weekend breakfast kind of pancake.  Enjoy!

How do you Charge your Electronics?

What’s the best way to take control of all of the electronics being charged in your house?

I’m a fairly organized person.  I prefer to have things in order, and put away as much as possible.  But here is my current dilemma, there are chargers everywhere in our house.  I have tried and tried to corral the cords, but they always end up back in their own little corners.  Near a chair here, or a table there.  For our house, The Party House that is, we have a never-ending stream of cords, especially in the living room.

Chargers for phones, chargers for netbooks, chargers for headphones (this a travel man thing), chargers for kindles, chargers for camera batteries.  Yes,  we do have a lot of electronic devices.  Remember,  I live with Travel Man, and he’s a “road warrior”, so he has a lot of gadgets.  I had been asking him what we can do to get the cords under control.  So our first solution has been to try  this:

A big charging station in my office, which is closest to the living room by the way.  This has definitely helped the situation.  But, when Travel Man comes home from a trip the chargers and cords multiply by leaps and bounds!  We have quite a few phones in the family that all use a similar charger.  I thought with my charging station some of the straggling chargers in the house would disappear and everyone could just use my office charging station.  The chargers around the house have diminished slightly, but not as much as I had hoped.

Oh,  and how many of you use your cell phone for an alarm clock too?  So that means you have to be able to charge your phone next to your bed.  Another cord!  See what I mean.  It’s getting almost to the level of the Tupperware dilemma.  You know how you have that one piece of Tupperware that you can’t find the lid for, or you have a lot of lids and no bowl.  It’s like they duplicate themselves when you are not looking!

If you have any suggestions for taking control of the “charging” dilemma please leave me a comment and let me know how you’re handling this situation.  Maybe it’s not a dilemma for you, I’d love to hear from you.


Tie-Dye Day at Camp Grandma

One fine sunny morning at Camp Grandma I decided it was time to try my hand at tie-dyeing.  I had purchased a little tie-dye kit at Joann‘s Fabrics, along with some white t-shirts that were on sale.

This kit included the three bottles with the dye powder, rubber bands, and plastic gloves, along with the instructions of course.  It was supposed to be enough dye to make 6 shirts.  We made two kids shirts and one adult shirt.

In order to make this a successful project with Evan I had to have ALL of the supplies we would need set-up before we got started.

We headed outside to a table I had set-up on the  patio, covered with black trash bags.  I wanted to keep the mess in an easy to clean up state.  And I knew that Evan,  being only 6, might not have the patience to wait around for the process we were about to dive into.  I was not able to take pictures of our processing, so I will do my  best to describe the steps of our project.

  • We laid two of the shirts out flat, and then pulled up the center of the shirt into a long skinny tube-like shape.
  • Then we put the rubber bands around the shirts in 4 or 5 spots along the length of the tube.  Similar to this:
  • For the third shirt, it was twisted it into a ball from the middle of the shirt. 
  • Next the rubber bands were placed around the ball like the sections of an orange. 
    The shirt looked like this:

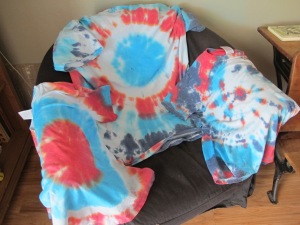
Now for the fun part.  Evan and I put on some plastic gloves and carefully and slowly began to apply the dye to the shirts.  Each section between the rubber bands was a different color.  We had red, navy blue and a teal blue.  Very patriotic in the end.  Once all of the dye was applied to all of the sections of the shirts they were left to soak for the rest of the day.  We put them inside plastic grocery bags, tied them shut and then cleaned up our table.

After about 6 hours the shirts were rinsed first under only cold water.  This was to remove the excess dye in the shirts.  Then the rubber bands were removed, and the shirt was rinsed again,  in only cold water.  This was to remove the last remaining bits of the excess dye that had not set into the fabric.  Next the shirts went into the washer, cold water only, on the shortest wash cycle possible.  Mine takes about half an hour.  Then I threw them in the dryer on a very low heat. 

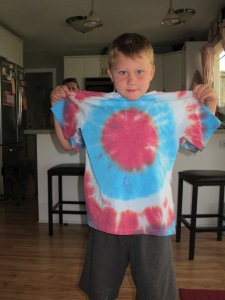
The end result looked like this:

We purposely left a section white, as we were going for the red, white and blue effect.  That was Evan’s idea.  But with this kit the colors set in very well.  Evan was so excited with how they turned out he modeled quite graciously for me.

When we do this project again,  I will make sure I have another set of hands to help with the mess.  The dye is fun to work with, but takes some skill in getting the colors on the sections of the shirts without running over into the next section.  This process is not as intense as using a Rit dye process, but the results were pretty good.  This project will be a great memory for Evan in the years to come.  I still have fond memories of tie-dying some awesome,  orange sheets with my Mom, and her girlfriends, and all of the kids, many moons ago.  

And to all of my family – what do you guys think about a tie-dye party for an end of summer shin dig, or maybe for the holidays?  Leave me a comment.


  • Subscribe to Blog via Email

    Enter your email address to subscribe to this blog and receive notifications of new posts by email.

    Join 1,175 other subscribers

Skip to toolbar