All of you have that certain small appliance sitting on your shelf collecting dust. My shelf is pretty big, and sometimes I forgot to look in the back of the shelf to see what is there. You know the second row of the shelf all the way in the back. A few weeks ago, I looked back there and was reminded that I have a bread maker. And it had quite a layer of dust on it. So I pulled it off of the shelf, cleaned it all up, and actually found the recipe book that came with the bread maker. I could not believe that one! Travel Man had to replace the plug for me and then I was all set to go.
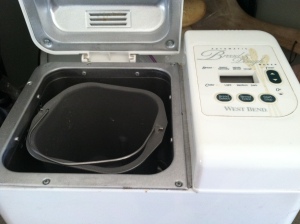 The bread maker is the easiest way to make bread known to man. Throw your ingredients in, in the correct order of course, and voila a beautiful loaf of bread. I had not made bread in a long, long time and everyone loved it, especially Evan. He keeps asking me when I’ll be making more. I made him his own personal loaf for Valentine’s Day. He kissed the loaf of bread when I gave it to him. Evan likes to have peanut butter sandwiches, and he told his Mom he could only eat them on the bread from Grandma now. Too funny!
For this loaf of plain white bread the ingredients are:
- 1 c. Water
- 2¾ c. Bread Flour
- 2 Tbsp. Dry Milk
- 2 Tbsp. Sugar
- 1½ Tsp. Salt
- 2 Tbsp. Butter or Margarine
- 2 Tsp. Active Dry Yeast
 The first thing you put in the pan is the water. Then mix the dry ingredients, except for the yeast, in a separate bowl and add on top of the water. Spread the dry ingredients in the pan evenly, and make a small well in the middle of the dry ingredients for the yeast. Measure the yeast and put it into the little well. Cut your butter into four small pieces, and place them on top of the dry ingredients in your pan. Put the pan into your bread maker, and turn it on.
For my bread maker it was set to basic bread with a medium color crust. Total bake time start to finish is 3 hours and 10 minutes. Once the bread is done you just pop it out of the pan, and cool for 15-20 minutes before eating. Then just slice, butter and enjoy.
 I have made six or seven loaves of bread in the last couple of weeks. Travel Man and I enjoyed some audacious french toast made with this bread for breakfast. Since we have all gotten back on our calorie counting recently I will only be making bread once a week now. Otherwise we just eat way too much. My next experiment with the bread maker will be to make homemade pizza dough for our wood grilled pizzas. Updates on that in a week or so.
Happy bread baking everyone!


