Archive for Recipes

Taco Salad for a Crowd

For the past two or three days it has been over 90 degrees here in So Cal, just a hint of summertime coming our way.  The hot weather calls for some lighter and yummy dinners.  Tonight I made the gang a  Taco Salad.  I called my Mom to find out the origin of this recipe, and we came to the conclusion that I was a recipe that was passed around the neighborhood when we were growing up.  However, I have put my own twist on the recipe, with the help of my daughter Naomi.

Ingredients:

  • 1 lb. ground turkey or ground beef (whichever you prefer)
  • 1 can of kidney beans (15 oz)
  • 1 pkg of taco seasoning
  • 1 bag of fritos (10½ oz)
  • shredded cheese (we like the cheddar & monterey jack combo)
  • shredded cabbage
  • tomatoes
  • green onion

Directions:

  • Brown the meat, and drain off the grease.
  • Drain the beans and add them to the browned meat.  I like to do this to heat up the beans.
  • Mix in the taco seasoning and the amount of water that is called for on the package.
  • Simmer this mixture until you have cooked off almost all of the liquid.
  • While the meat is simmering;
  • Chop up the tomatoes
  • Chop up some green onions.
  • Chop the shredded cabbage into smaller bite size pieces.
  • Crush the fritos, in the bag, with a rolling-pin.  Open the bag a bit first though to let out the air.

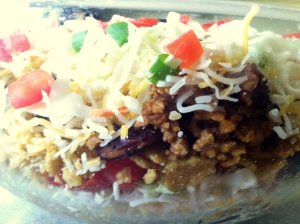
    Salad Layers

For the salad assembly: 

  • The layering effect is Naomi’s twist on the recipe.
  • In a large glass bowl layer the ingredients like this:
  • Fritos
  • Meat and beans
  • Cheese
  • Shredded cabbage
  • Tomatoes
  • Green Onion
  • Then repeat the layers for a second time.
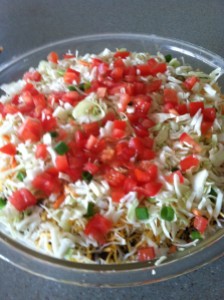
  • You can either serve the salad layered, or if your adventurous like me you can toss the whole salad and serve.
  • For garnishments put out your favorite salsa, sour cream, and black olives (that’s ones for you Hilary!)

Variations:

  • This recipe can easily be made with shredded chicken or beef.
  • You could add additional cans of different types of beans (black or pinto).
  • You could flavor the meat with your favorite salsa instead of taco seasoning.
  • Any garnishments that you like can easily be put on top or served with your salad on the side.

This is truly a yummy recipe, and so easy to throw together.  Oh and I like using the shredded cabbage because it does not get soggy at all.  I put out the cabbage when we have just plain old tacos in the shell too.  For this twenty-something household, this salad makes a great big meal and is great for staying on budget.  If you’ve never made this before it’s a real treat.  If you haven’t made it in a while you’ve been missing out like me.  I’m definitely mixing this recipe in with my weekly summertime meal planning. 

Please stay tuned for my Mom’s Taco Salad recipe for Two.

My Domestic Goddess Status – Just an Update

It is almost the end of April, and it has been just about a year since I quit my job in the Corporate arena!  My how time flies!!  I was crowned by my beloved Travel Man as the Domestic Goddess of our household shortly after I decided to stay at home for a while.  Little did I know how much I would love this title.  If you follow my stories you know I left my job a year ago to pursue other interests.  Here’s a link to my post from last April about my life change-Our Girls Vision Luncheon.

In the past year I have had the opportunity to spend time with my grandson, do lots and lots of baking, do a little bit of sewing ( I want to get more of this done soon!), start and finish some little home improvement projects,  take a few trips with Travel Man, try some new recipes, add to our list of family favorite recipes, read more books, and generally have the luxury to just come and go as I please.  This has all been so personally rewarding for me.  Getting to discover what I love to do again, and who knew that I had a passion for writing.  I always felt that I had some stories to tell that people would relate to, but I did not realize how much I would enjoy sharing them.

My Domestic Goddess title was given to me by my loving husband.  It is because of his encouragement and support that I am able to do what I want to do.  Thanks Travel Man for all that you do.

One of my biggest perils in my new-found title is getting side tracked when I am working on things around the house.  Does this happen to anyone else?  I have had a few discussions with my sister, who works from home, about this, and she tells me the same thing I am already feeling.  If you don’t stay focused on the task at hand you get sidetracked to some other task, and then you have to re-focus to get back to the task at hand.  Was that statement too confusing, it made my head spin just typing it.  That’s why I am really focusing on my lists everyday.  To stay away from the “side tracks”.

Also, I have had the good fortune to just pack my bags and take a few short trips with Travel Man.  We went to Reno to visit my parents, and last year I was able to take a long road trip with him from Franklin, Kentucky to home.  Lots and lots of fun being on the road with someone who travels for a living.

For awhile Travel Man’s days off were falling during the week, so our “weekends” would be happening on a Tuesday/Wednesday timeframe. No worries for us, we are just able to do what we want to when he is home. Sometimes at Disneyland, maybe out to dinner, a visit to the parentals, some time with the grandson, and hopefully a dinner together with the twenty-somethings.

This has been a great year of re-discovery for me.  A big hug and thank you to all of my family for your loving support and guidance.  I’m looking forward to more and more new discoveries in this next year, and hope to share the stories with each and every one of you.

You Should Really Try My Pasta Bake

One of my favorite quick and easy, make it through the work week recipes is for Pasta Bake.  This recipe was originally discovered on a Prego spaghetti sauce label quite a few years ago.


Gather these ingredients:

  • 16 oz. of uncooked pasta (use any shape)
  • 1 – 24 oz jar of spaghetti sauce
  • 1 – full jar of water (use the sauce jar)
  • 2-3 cups of shredded mozzarella

Directions:

  1. Preheat the oven to 425°.
  2. Pour uncooked pasta into a 9 x 13″ pan, and add the sauce and water.
  3. Stir and bake covered with foil for 35 minutes.  This allows the pasta to cook in the sauce and water mixture.
  4. Uncover, sprinkle the top with the mozzarella.
  5. Bake for an additional 10 minutes.  The cheese should be golden brown.
  6. Remove from the oven and serve with a salad and your favorite garlic bread.

Variations:

This is a great recipe to embellish with  your favorite ingredients.  You can easily add italian sausage, mushrooms, or any other favorite italian goodies that you love before you put the pan in the oven for the first time.  I also highly recommend using a rotelle pasta, that is our current favorite around the Party House.

This is a great recipe if you are a beginner cook.  It is so simple and yummy and scrumptious.  You are guaranteed a great dinner.  Oh and it is also a great dinner for a crowd.  If you have a crowd like mine though you need more than one pan.  The leftovers, if you are lucky enough to have any will warm up like a leftover spaghetti sauce.  And finally if you make your own spaghetti sauce, like I do, you can substitute your homemade sauce for the bottled stuff.  This recipe is definitely a family favorite, and will be passed along for generations to come.  Buon appetito!!

Fluffy Lemon Cheesecake – No Baking Required

As I promised you all earlier in the week I wanted to share my cheese cake recipe that I made for my daughter’s birthday bonanza last weekend.  Hilary had originally requested a lemon cake with cream cheese frosting.  But being the persuasive mother that I am I asked her if she would rather have lemon cheesecake, and she said Yes!

Oh and by the way, I also had two graham cracker crust staring at me from my pantry just calling out to be used.  See what I mean about be persuasive. 

So the ingredient list looks like this:

  • 1 graham cracker crust – store-bought or from scratch, whichever you prefer.
  • 1 (8oz.) package of cream cheese, softened
  • ½ cup sugar
  • 1 (8oz.) container of Cool whip, thawed
  • 2 tsp lemon juice
  • 2 tbsp lemon zest

Blend the cream cheese, sugar, and lemon juice together until smooth.  Fold in the Cool Whip and about 1½ tbsp of the lemon zest, save a smidge for a garnishment.  Pour the mixture into the graham cracker crust, and sprinkle the remaining lemon zest on top.  Chill in the fridge for at least 2 hours.  This is a very light and yummy cheese cake.

A few variations of this recipe- some food for thought so to speak:

  • You could use lime juice and lime zest.
  • Leave out the citrus flavorings all together and garnish with fresh fruit – strawberries or kiwi.
  • Use no flavorings in the cheesecake, and top with a thin layer of sour cream.
  • This is a great recipe for making individual mini cheese cakes – my niece loves to make these.  You can purchase the mini graham cracker crust at your local grocery store.

This a fabulous summertime recipe since there is no oven time required.   With spring and then summer just around the corner hang onto this recipe for the warm weather to come.

Happy Friday everyone.  Enjoy!  P.S. Photo credits to Elaine Zee.  Thanks Elaine!

I Found my Pizza Dough Recipe

Hello pizza fans.  After our recent birthday party bash I though I would share my pizza dough recipe with all of you.  My family loves pizzas, and they especially love it when it’s cooked on the charcoal grill with the Kettle Pizza attachment. If you click-through to this link for the Kettle Pizza attachment you should see a video done by my Travel Man.

After some trial and error the last few weeks I think I have found a recipe for pizza dough that is great.  I have been working to find a pizza dough recipe that I can make in my bread maker.  Then I will be able to make the pizza dough and freeze it ahead of time.  This will give me a  pizza dough inventory at a moments notice.  The challenge was to find a recipe that had good texture and would freeze well.

So the recipe that I really found that I like goes like this: and remember this is intended for a bread maker.

  • 3/4 c water about 110 degrees
  • 1 tbsp veg. oil
  • 1 tsp lemon juice
  •  2-1/4 c bread flour
  • 1 tbsp dry milk
  • 1 tbsp sugar
  • 1/2 tsp salt
  • 1 tsp dry yeast

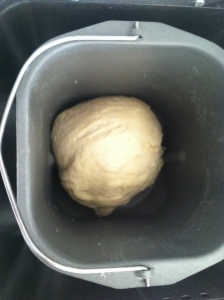
Place the ingredients into your bread maker in the order listed above.  Liquids first, then all of the dry ingredients except the yeast make a small little well in the dry ingredients, and add the yeast in this spot.  Start your bread maker on the “dough” setting and let it go.  My bread maker takes about 1 hour and 20 minutes.

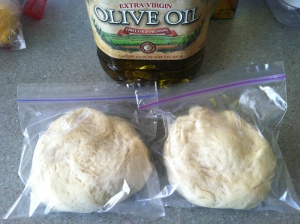
Once the dough was finished I sliced it in half, rubbed with some olive oil and placed into sandwich baggies, and then in the freezer.  One batch of this dough makes enough crust for two medium-sized pizzas, thin crust of course!  We were cooking our pizza on the stone in the grill so if they were a little misshapen when we rolled them out it was no big deal.

I’m really happy with this recipe.  I liked the texture of the dough when it came out of the bread maker.  If you have a bread maker and a craving for pizza try this out and enjoy!

  • Subscribe to Blog via Email

    Enter your email address to subscribe to this blog and receive notifications of new posts by email.

    Join 1,175 other subscribers

Skip to toolbar