Tag Archive for Christmas tree

Oh Christmas Tree, Oh Christmas Tree

1-IMG_0045I promise this will be my last post concerning Christmas trees from the  2012 holiday season.  But I could not share this story with you until all of the gifts had been given.

Many, many moons ago I did some Christmas crafting, and made some ever so cute fabric Christmas trees.  At that moment in time I was a young mom, and would craft my little heart out and sell them at a Christmas boutique every year.  Fun memories.

Over the years I lost my fabric Christmas tree, and had not made any new trees for quite some time.  Then when we were visiting my sister in October, she told me that she had to throw her little tree out because it got moldy.  I was so sad for her I knew exactly what I would give her for Christmas.

I scoured my Babe Cave (aka the sewing room) looking for my old Christmas tree pattern and I could not find it anywhere.  Oh Boo!  So of course I went to JoAnn’s found the pattern (so elated McCall’s still had this pattern), got my supplies, and went home to make trees.  By the way I already had the fabric.  I had purchased it on clearance last Christmas season.

I decided to make one for my sister, one for my brother, and one for myself.  We would all have the same tree from the same fabric.  Kind of cheesy I know, but I’m cheesy and traditional like that.

So here’s how they go together:

The trees are made from a McCall’s Crafts pattern 3777.

2-IMG_0048

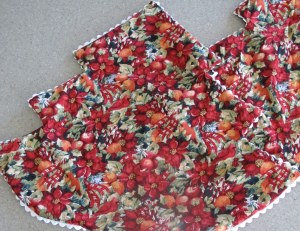
For each tree you are making you cut out 6 pieces of the tree pattern.  You can also use contrasting fabrics, so in that case you would cut 3 pieces from each fabric.  I’m going to be making some trees with contrasting fabrics for next Christmas.

3-IMG_0049

The next step is to baste either rick-rack or some type of lace around the edges.  You baste 1/2″ from the edge.  This step is completed only on 3 pieces of the trees.  Leave the other 3 plain to form the tree sections.

Next, sew two pieces right sides together, and leave an opening on the bottom according to the pattern.  Be sure you have one piece with your trim, and one without.  Trim your seams, and clip the corners and curves.  Turn the pieces right side out and press flat.  You should now have three pieces to stitch together to form your tree.

IMG_0055

Lay two of the sections on top of each other and baste through the center according to the pattern.  The pattern piece has a line for you to trace to follow for this portion of the stitching.  Lay the third piece on top of the two you have previously basted together.  Line up your edges, etc. and pin in place.  Stitch through all three layers.  You should now have six openings in the bottom of the tree. This forms six sections that will be stuffed to form the tree.

1-photo

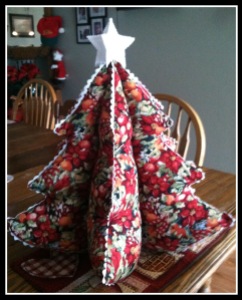
Once you finishing stuffing and plumping your tree, you stitch the openings closed, add a star and voila a nice little tabletop tree for years to come.  The beauty of this pattern is that you can choose very simple or very elegant fabrics.  You could embellish with mini ornaments, or ribbon bows.  The sky is the limit.

And a funny side note to this story-  as I was assembling the trees I was making I started  digging around in one of my little Christmas storage bins.  In the bottom of this bin there were some pattern pieces all folded up nice and neat. I unfolded the pieces and there were some patterns for a few different ornaments.  The last piece I unfolded was my old, old pattern for the fabric Christmas trees I had made so long ago.  I laughed to myself for a few minutes, and got back to my sewing.

I’m thinking next year of making some plaid trees for the younger crowd in the family.   Or maybe polka dot trees for the girls and plaid trees for the boys.  Time will tell, we’ll have to wait and see.  If you like to sew, and are a crafter at heart give this pattern a try.  It’s a lot of fun.

Our Christmas Tree Revamp

Yes we have an artificial tree. Yes, I can put up my tree whenever I choose.  Provided I have someone here to help me get it out of the rafters (thanks boys!). My artificial tree has (had) white lights Pre-wired to the branches.  Lots of white lights.  It’s a really pretty tree even of you don’t put any other decorations on it.

It would normally look like this-

IMG_3264

Last Christmas I was having some issues with the lights on the tree shorting out.  We bumbled along and made the lights work through the holiday time.  When the tree came out for its annual decorating this year Travel Man helped me check the lights as we were assembling the tree.  We figured out where there was a bad plug, got it repaired  and thought we were golden.  All of the lights were working, we were off to a good start.

Until……. the next morning.  The entire middle section of lights on the tree had shorted out-again!  Problem is once the tree is completely assembled , the branches are fluffed, and the tree is generally looking good it’s a total pain in the toukas to take it apart, and fix anything.

So, we made the executive decision to bypass the white lights all together.  The white lights were not going to co-operate, and I had no patience for them.  We were not going to take the tree apart, and we had two strings of colored lights to starts us off on the tree re-vamp.  That meant we only had to buy three more strings  to finish off all of the lights, and my budget could handle that expense.  The white lights  were unplugged and we put colored led lights on the tree, our collection of ornaments, and last but not least- the tinsel!  Yes that’s right we have tinsel on our tree.  I’m calling this our retro tree because the tinsel totally brings  back childhood memories for myself and Travel Man.

Of course ours kids are divided on the appearance of the tree.

1-IMG_0067

  • What happened to the white lights?  We changed them up decided to do something different.
  • Tinsel?  Really who uses tinsel?  We do.  Another change to our traditional Christmas.

Grandson Evan tells me last night, “Grandma, I like the tree this way.  It’s really pretty.”  Melt my heart.  I’ll put colored lights and tinsel on the tree every year just for Evan!

I have to admit I’m a huge fan of the all white lights on the tree.  I think it’s because it reminds me of snowy winters in Illinois in a strange round about way.  But going retro with this tree has been fun.  Colorful, tinsselly fun.  Is tinsselly really a word?

So for Christmas 2012, the decorations are complete, and my annual tree revamp is done, and I am happy.  Maybe I’ll start doing a different theme for the tree every year.  All Santa’s on the tree, or all angels on the tree.  Maybe next year we’ll add garland, or the kids favorite garland –  colored strings of beads!!

What your favorite Christmas tree theme?  And was that a real tree or an artificial tree you put up?

Christmas Tree Follies – Part 2

There is a part of Christmas that is more enjoyable for me than any other.  I love, love, love putting up the Christmas tree, and getting it all lit up for the first time.  And then we just add ornaments, nothing more.  As a matter of fact most of the ornaments on my tree are the annual ornaments that I bought for each of this kids that are still living at home, from the time they were born.  They really fill the tree quite nicely.

Anyway, remember early in December when I told you all the story of buying my artificial tree. If this is your first time here take a look at this story: Christmas Tree Follies.  I think this is my fourth or fifth Christmas with this tree.  It has been a rock star.  Just take it out the box, assemble correctly (which is a story in and of its self), and plug it in.  There you go.

So the tree should look like this when it is all decorated:

But about 10 days into December my tree looked like this:

I asked Travel Man what we could do to repair it and he said we would have to take the ornaments off and pull it apart so he could check the wiring.  Well that wasn’t happening before Christmas so I just lived with it, and without the lights for about a week.  Then I dug around in the garage and found and extra string of white lights, plugged them in and strung them around the tree.  They weren’t quite the same as the real thing, but they filled in the gap a little bit.

We took down our beloved tree on New Year’s Eve, and Travel Man was able to check the wiring.  Lo and behold it was just a blown fuse.  So he replaced the fuse for me, we tested the lights, and packed it all up for Christmas 2012.    Hopefully, this tree will last us a few more years, or until they come out with an LED version that Travel Man and I can agree that we like!  Did you have a real or artificial tree this year?

  • Subscribe to Blog via Email

    Enter your email address to subscribe to this blog and receive notifications of new posts by email.

    Join 1,175 other subscribers

Skip to toolbar