Archive for DIY Projects

Our House got a “Reboot”

This past weekend Travel Man and I decided it would be a good time to knock some items off of our “Things to get done Around the House” list.  I don’t really call this list our “Honey-Do” list, because a lot of times we work on the list together.  Especially if it is something I don’t really know how to do, or want to learn to do.

On this particular Saturday,  Travel Man was putting up a ceiling medallion in our bedroom around the ceiling fan.  This required the power to the electric circuit in our bedroom to be turned off.  The circuits in our house are just a bit quirky, and on the electrical panel some of our circuits were labeled and some were not.  This issue of course has now been corrected.

We formed a little family assembly line so that when the power to our bedroom was off, I yelled to our daughter whether or not the power was cut,  and she relayed the message to Travel Man outside.   A little back note here; our ceiling fan can run with or without the light on.  I did not have the light turned on when we started this relay process.  Travel Man had gone through almost all of the circuits or more before we,  or should I say,  I realized that it would be easier if I had the light turned on to tell when the power was cut.  We went through the entire electrical panel, and back to the very first circuit before the power was cut.  Ooopsy doodle, I should have turned the light on much, much sooner.  It would have saved my guy the trouble of flipping all of the switches in the entire panel.

After we were all done just getting the power shut off, the ceiling medallion was in place and the power was back on, I said, “Hey, we actually re-booted the house today!”  I’m pretty sure Travel Man laughed at that one, and told me I should write a blog post about our adventure.  So I did.

Many times,  the time that Travel Man and I spend around the house together is limited.  Sometimes we choose to  focus on the house , and make the most of that time and get a few needed repairs done.  Other times we don’t worry about the fixes around the house and we just focus on us spending some time together.  That’s when we usually go to Disneyland to do some serious people watching.

How’s your “Things to get done around the House” list going?  What’s the last thing in your house that got repaired or updated?

This post has been linked to the GRAND Social linky

Our Christmas Tree Revamp

Yes we have an artificial tree. Yes, I can put up my tree whenever I choose.  Provided I have someone here to help me get it out of the rafters (thanks boys!). My artificial tree has (had) white lights Pre-wired to the branches.  Lots of white lights.  It’s a really pretty tree even of you don’t put any other decorations on it.

It would normally look like this-

IMG_3264

Last Christmas I was having some issues with the lights on the tree shorting out.  We bumbled along and made the lights work through the holiday time.  When the tree came out for its annual decorating this year Travel Man helped me check the lights as we were assembling the tree.  We figured out where there was a bad plug, got it repaired  and thought we were golden.  All of the lights were working, we were off to a good start.

Until……. the next morning.  The entire middle section of lights on the tree had shorted out-again!  Problem is once the tree is completely assembled , the branches are fluffed, and the tree is generally looking good it’s a total pain in the toukas to take it apart, and fix anything.

So, we made the executive decision to bypass the white lights all together.  The white lights were not going to co-operate, and I had no patience for them.  We were not going to take the tree apart, and we had two strings of colored lights to starts us off on the tree re-vamp.  That meant we only had to buy three more strings  to finish off all of the lights, and my budget could handle that expense.  The white lights  were unplugged and we put colored led lights on the tree, our collection of ornaments, and last but not least- the tinsel!  Yes that’s right we have tinsel on our tree.  I’m calling this our retro tree because the tinsel totally brings  back childhood memories for myself and Travel Man.

Of course ours kids are divided on the appearance of the tree.

1-IMG_0067

  • What happened to the white lights?  We changed them up decided to do something different.
  • Tinsel?  Really who uses tinsel?  We do.  Another change to our traditional Christmas.

Grandson Evan tells me last night, “Grandma, I like the tree this way.  It’s really pretty.”  Melt my heart.  I’ll put colored lights and tinsel on the tree every year just for Evan!

I have to admit I’m a huge fan of the all white lights on the tree.  I think it’s because it reminds me of snowy winters in Illinois in a strange round about way.  But going retro with this tree has been fun.  Colorful, tinsselly fun.  Is tinsselly really a word?

So for Christmas 2012, the decorations are complete, and my annual tree revamp is done, and I am happy.  Maybe I’ll start doing a different theme for the tree every year.  All Santa’s on the tree, or all angels on the tree.  Maybe next year we’ll add garland, or the kids favorite garland –  colored strings of beads!!

What your favorite Christmas tree theme?  And was that a real tree or an artificial tree you put up?

We Made Garden Markers

The gardening season is in full swing and I have a few projects that I’ve been meaning to share with all of you.  We are already harvesting our zucchini, and had our first grilled zucchini last week.  Oh yum.  And by the way how is it possibly the 6th of August already?  Didn’t we just celebrate the 4th of July?

I had been wanting to make plant markers for the garden so it would be easy for Evan to know what all of the plants are, and just because I thought it would be cute.  Plus I had seen a lot of ideas for the markers on Martha Stewart‘s crafting page, so I was inspired.  And as a bonus to the budget, I wanted to spend as little money as possible on this project. 

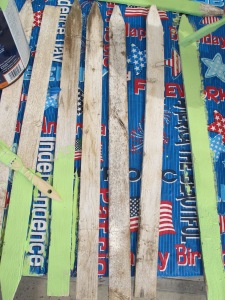
There were these dilapidated stakes from a short border fence we had taken apart at one time or another.  Great these will be my new garden markers.  Next I went into the garage and perused my leftover paint shelf.  There was this great green color just calling my name. I call it my lime sherbet paint.

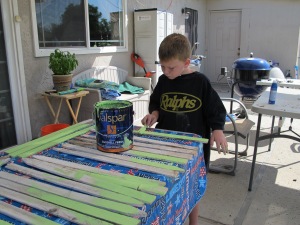
 So off Evan and I went to paint the sticks.  This was of course during one of our “Camp Grandma” days.  Evan loves to paint so I knew he would be a good helper for this project.  We painted one side of the sticks, let them dry, turned them over and then painted the second side.  This took up most of our morning, and then we went for a swim.  I left the sticks to dry overnight, so we could put the lettering on for the plant names.

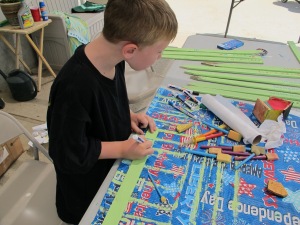
The next week at Camp Grandma we painted the plant names on the sticks.  I bought some paint pens (the only thing I had to buy!), as I knew this would make it easier for Evan to help me.  I was really glad I got them because he had a lot of fun being creative with his lettering.

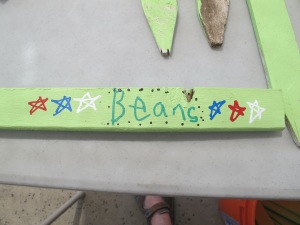
These are my favorites of everything we painted.  I love how Evan got the patriotic theme going.  And he did make one marker that says, “Evan is cool”. 

Here’s the rest of the finished markers, and how they look in the garden.

This was a great, inexpensive project.  It was fun collecting all of the supplies from “stuff” on the shelves around the garage and in the garden shed.   Evan and I had a lot of fun together, and the markers look so great in the garden.  A great summertime project.  Of course Evan had more fun making mud pies.  More on that adventure later.  Happy Monday everyone! 

The Tomatoes are Growing

Hello neighbors.  Yes I’m still here and no I haven’t gone anywhere.  You see Travel Man got home from his second international trip last Saturday, and we’ve been spending some much-needed time together.  He’s only been home 8 days in the last 30, and now he’s home all of this week (anxiously keeping my fingers crossed).  We’ve been having some great meals together, and working in the garden together.  Always a lot to do in the garden.

This year I planted 5 tomatoes plants.  The varieties I purchased from Lowe’s and Home Depot were; Roma, Better Boy, Big Boy, and Celebrity.  A pretty ambitious effort for me, because at the end of last summer I had proclaimed I would only plant two tomato plants this year.  I’m crazy like that, sometimes I just like to go for the gusto!  So I had intended to share these pictures with all of you about a month ago, and somehow they got lost in the “Camp Grandma” menagerie of pictures.

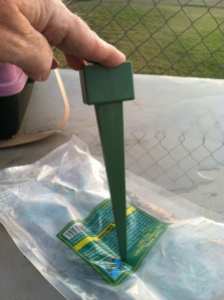
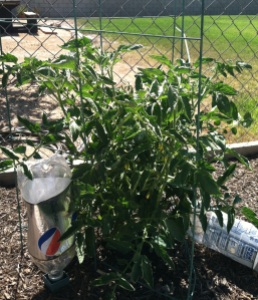
This little contraption is what I am using to water the tomatoes this summer.  Of course in Southern California we have some extreme heat in the summer.  Travel Man found these for me at one of his favorite hardware stores, and I was readily willing to try them.  The spike holds a two liter soda bottle.  It has little holes down each side of the spike to allow the water to flow through to the roots.  With the heat we are having right now I am filling the bottles up twice a day.  In the morning and again in the early evening.  So far so good as the tomatoes are thriving.

This picture of the Roma tomato plant is from a month ago.


And this is the same plant today.  I finally added the cages and staking to all of the tomato plants last weekend.  Now it’s just keeping up with the watering and weeding, and waiting for the arrival of the first tomato!!  I cannot wait to have my first BLT with a garden tomato!

We (meaning Travel Man and I) are having an ongoing discussion about the best way to let the tomatoes grow.  My mindset has always been to just put the cages up and let them go to town.  Travel Man’s theory is we should keep them pruned inside of the cages to get a better crop of tomatoes.  I am trying it Travel Man’s way this summer, so I can see how the plants to in the raised bed they are growing in.  And I have to give his idea a chance too.  I like to try to see things from all sides, and not be the “fathead”.  So that being said it brings me to my question for all of you who garden or have gardened in the past.  “To prune the tomatoes, or not prune the tomatoes?”   That is my question to all of you.  Looking forward to hearing some great gardening opinions.  Happy Wednesday to everyone!

Find a Container and Garden

One of my favorite ways to dress up my patios in the summertime is with containers of plants and flowers.  Big pots, small pots, any size at all pots.  I love to have the flowers all around on the patios.  Last week before the 4th holiday I was replanting all of my big flower pots on the patio.  I thought I would share my process as it’s really simple, and a great way to spruce up your patio for summer time, spring time, fall time, or anytime at all time.

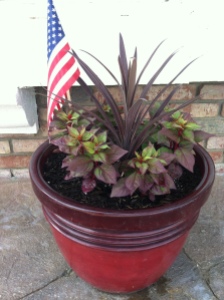
I had two big red planter pots that were on my front patio.  And they had been empty for a while, so I decided this was the week to replant.  These are plastic pots so they’re very lightweight.  It’s very easy to find the lightweight pots these days.  All of the home improvement stores carry them, and at Wal-Mart the bigger pots are especially budget friendly.


So, take your big empty pot, and add some empty water, or soda bottles, and fill the pot about 1/3 to 1/2 of the way full.  I saw  this trick on one of the home improvement shows, and filed it in my list of things to remember.  This makes the big pot so much lighter when you are finished.  If your twenty-somethings aren’t around you can lift this one by yourself.   And with this method you save some money on potting soil too.

Next cut a piece of weed cloth and lay it on top of the layer of bottles. This  will contain the potting soil.  Then add your potting soil and fill the pot to the top.

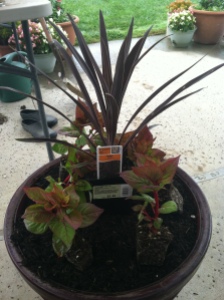
Now it’s time to select your plants.  For this pot I chose the tall spiky plant in the middle first.  This is called a Cordyline.   I picked this one for the great color on the leaves.  Just the color I was looking for.  Then I found the flowers to surround them.  This plant is a Celosia.  It will get yellow and red flowers.  I choose this one for the colors in the leaves too.  Just love the vibrant greens.   I set the plants on top of the dirt first to get my arrangement just right.

Now it’s time to get everything planted in the pot, and water generously to get all of the plants settled in the dirt. Move the beautiful pot to its new home and enjoy!!  I like to use annuals in all of my pots so I can change them out for each season.  It’s a great way to add color to your patio.

Have you tried any container gardening lately?


  • Subscribe to Blog via Email

    Enter your email address to subscribe to this blog and receive notifications of new posts by email.

    Join 1,175 other subscribers

Skip to toolbar