Tag Archive for Recipe

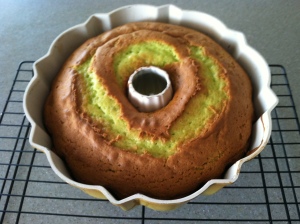
Pistachio Pudding Cake

In honor of St. Patrick’s Day here’s a great dessert you can whip up for the cake lovers in your family.  I posted this recipe last summer, and thought this would be a great time to share it again.

This cake recipe is a yummy little recipe that my Mom has made for me over the years for my birthday.  It’s one of the top 5 moist cakes around.  I imagine that you could use other flavors of cake mix and pudding mix to change it up, but my favorite has always been the pistachio flavor.  Not everyone loves the pistachio flavor like I do, but I have to say everyone at my house tried it and liked it.

For the Cake:

  • 1 box pineapple or lemon flavored cake mix
  • 1 30z box of pistachio instant pudding
  • 4 eggs
  • ½ c. vegetable oil
  • 1 c. cold water

Mix all of the ingredients well  and pour into your favorite angel food or bundt pan.  Grease the pan first.  Bake at 350º for 5o minutes.  Let this cool on a wire rack, and then remove from the pan on to a plate for frosting and serving.  If you have the time,  refrigerate the cake overnight before frosting.  This will keep the cake really, really moist.

Baked Cake – Cooling

For the Frosting:

  • 1 3oz. box of pistachio instant pudding
  • 1 pkg of Dream Whip
  • 1¼ cups of milk

Beat all of the ingredients well.  The frosting mixture should form small peaks, just like a whip cream style frosting.  Frost the cooled cake and refrigerate or serve immediately for your eating pleasure.

And don’t forget the milk or coffee to go along with it. This is a great summer time cake.  The frosting is light, and the cake is moist.  This was a welcome home treat for my Travel Man, and it did not last long.  A great recipe to pass along.  Thanks Mom!

Have you ever Made Frosting with Flour?

I realized this week that I have neglected to post any recipes recently.  This is probably due to the party planning time, and actual parties in session over the past few weekends.  There is a recipe I have been meaning to share with everyone for a while now.  My Mom has a time-honored recipe for the best tasting frosting ever.

In our house this recipe is called “The Flour Frosting” recipe, and it goes something like this:

Ingredients:

  • 1 Cup Milk
  • 1/4 Cup Flour
  • 1/2 lb Margarine or Butter, softened
  • 1 Cup Sugar
  • 2 Tsp. Vanilla

Directions

  1. Mix the milk and flour together in a small saucepan on the stove. Cook on medium heat stirring constantly until thickened. Cool this mixture completely in the fridge.
  2. Beat the sugar and margarine together until creamy.  This is a critical step, the butter and sugar must be smooth and creamy in order for the frosting texture to be smooth and creamy.  There can be nothing grainy going on with the butter and sugar.  If this happens the frosting will look separated, and not taste very creamy.
  3. Add the cooled flour mixture to the butter and sugar, along with the vanilla.
  4. Beat until fluffy, and frost your cake!

This frosting is very creamy and extremely delicious, just a little warning.  It is not really the variety of frosting that you can do a lot of serious Wilton style decorating with.  But you will not be disappointed in the flavor and pure yummyness that this frosting delivers.

1-DSC012421-IMG_0093

These are my brothers’ birthday cakes from his last two birthdays, both covered with flour frosting.  This frosting is his favorite and he always requests it for his cakes.  It is one of my all time favorites too.

Yesterday I found a recipe similar to my Mom’s on the Tasty Kitchen.  This recipe is called, That’s the Best Frosting I’ve Ever Had.  This is quite similar to my Mom’s recipe, and goes into some additional detail on the mixing directions.

If you are making your someone special a delicious Valentine’s Day treat, try this recipe out.    If you have some cupcakes or a cake to bake this week, try this recipe out.  If you have some graham crackers lying around, and some of this frosting leftover you can put them together for a delicious treat.  You will not be disappointed.  Happy baking everyone.

Oh I had fun making Cinnamon Rolls

1-IMG_0099

Now I know everyone is busy this week setting goals for the new year, maybe trying to cut back on the sweet treats and what you are eating, but the next time you have a sweet tooth and need a great sweet treat, you need to try this recipe.

Over the holidays I created the cinnamon roll recipe from my Pioneer Woman cookbook.  Oh and what fun I had.  I’m  pretty sure this was the last treat I put together for my 2012 Christmas baking season.  First of all you need to understand the I am a bread-head.  I love anything breadalicious.  Bread, rolls, French bread, sweet breads. ,yum, yum.

I actually haven’t made anything along the lines of a bread recipe since October when we had a homemade pizza party.  So I gathered the ingredients, made the dough as directed, and voila here’s what it looked like after is had risen for about an hour.  Beautiful isn’t it?

1-photo-001Whenever I see a bowl full of poofy dough like this I just want to punch it down and smell the sweet bread flavors, and I did.

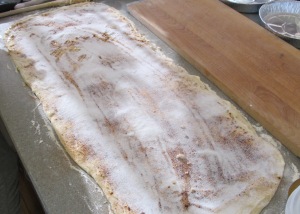
Next was rolling out the dough into a semi-rectangle, and adding the toppings.  butter, cinnamon, sugar, butter, cinnamon, sugar.  It was wonderful.

1-IMG_0084

1-IMG_00851-IMG_0088

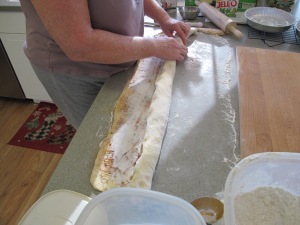
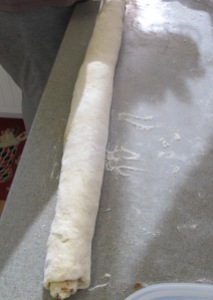
Then came “The Roll”!!  Starting at one end and rolling as tightly as you can, but uniformly until you end up with your rectangle of dough looking like this…

1-IMG_00911-IMG_0092

This recipe makes two long rectangles for the cinnamon rolls.  The first rectangle I rolled was a little bit loose, and I probably could have rolled slightly tighter.  By the second rectangle I had my system in order and it turned out great.

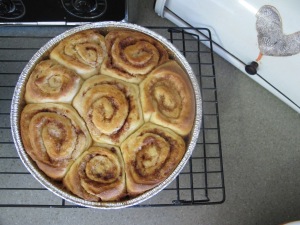
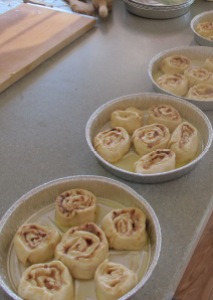
Then you cut the rolls, place them into your baking pans, and let them rest and rise again.  I used foil pans, since most of these were going to friends and family for a Christmas treat.

1-IMG_00941-IMG_0098

Once they rested, they go into the oven for 20 minutes, frost and you are ready for some seriously sweet noshing.  But make sure you include a good cup of coffee with your treat.  Then it becomes spectacular.

I had so much fun rolling the dough and putting the rolls together.  The texture of this dough was fantastic, and made the assembly process all the easier.

My taste testers here at the house have proclaimed that this recipe must be a new Christmas tradition.  I agree.  I will add this to my annual Christmas baking arsenal for many years to come.

What’s your favorite baking recipe?

>> Photo credit for this post goes to my Travel Man…

The Most Popular Revelings Post for 2012

This recipe was posted over the summer months, and it has been the most popular post on my site for this year.  If you missed out on the taco yumminess you may want to give this one a try.  It’s definitely a great recipe for anytime of the year.  Enjoy!

Taco Salad for a Crowd – Originally posted in May 2012

For the past two or three days it has been over 90 degrees here in So Cal, just a hint of summertime coming our way.  The hot weather calls for some lighter and yummy dinners.  Tonight I made the gang a  Taco Salad.  I called my Mom to find out the origin of this recipe, and we came to the conclusion that I was a recipe that was passed around the neighborhood when we were growing up.  However, I have put my own twist on the recipe, with the help of my daughter Naomi.

Ingredients:

  • 1 lb. ground turkey or ground beef (whichever you prefer)
  • 1 can of kidney beans (15 oz)
  • 1 pkg of taco seasoning
  • 1 bag of fritos (10½ oz)
  • shredded cheese (we like the cheddar & monterey jack combo)
  • shredded cabbage
  • tomatoes
  • green onion

Directions:

  • Brown the meat, and drain off the grease.
  • Drain the beans and add them to the browned meat.  I like to do this to heat up the beans.
  • Mix in the taco seasoning and the amount of water that is called for on the package.
  • Simmer this mixture until you have cooked off almost all of the liquid.
  • While the meat is simmering;
  • Chop up the tomatoes
  • Chop up some green onions.
  • Chop the shredded cabbage into smaller bite size pieces.
  • Crush the fritos, in the bag, with a rolling-pin.  Open the bag a bit first though to let out the air.
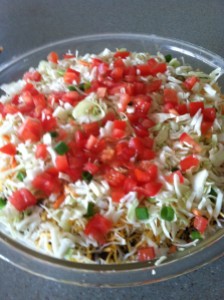
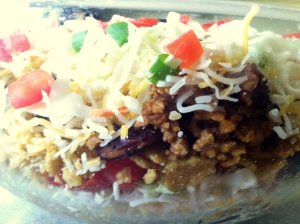
                                                         Salad Layers

For the salad assembly: 

  • The layering effect is Naomi’s twist on the recipe.
  • In a large glass bowl layer the ingredients like this:
  • Fritos
  • Meat and beans
  • Cheese
  • Shredded cabbage
  • Tomatoes
  • Green Onion
  • Then repeat the layers for a second time.
  • You can either serve the salad layered, or if your adventurous like me you can toss the whole salad and serve.
  • For garnishments put out your favorite salsa, sour cream, and black olives (that’s ones for you Hilary!)

Variations:

  • This recipe can easily be made with shredded chicken or beef.
  • You could add additional cans of different types of beans (black or pinto).
  • You could flavor the meat with your favorite salsa instead of taco seasoning.
  • Any garnishments that you like can easily be put on top or served with your salad on the side.

This is truly a yummy recipe, and so easy to throw together.  Oh and I like using the shredded cabbage because it does not get soggy at all.  I put out the cabbage when we have just plain old tacos in the shell too.  For this twenty-something household, this salad makes a great big meal and is great for staying on budget.  If you’ve never made this before it’s a real treat.  If you haven’t made it in a while you’ve been missing out like me.  I’m definitely mixing this recipe in with my weekly summertime meal planning.

My Favorite Sloppy Joes

I’m in a recipe kind of mood this week.  Probably because there is the tiniest hint of fall in the air, probably because I’ve been busily harvesting all kinds of goodies from my garden, and most importantly because I just love to cook.  I’ve made a lot of different sloppy joe recipes, even the Manwich variety.  I remember making sloppy joes in 4-H when I was 10 or 11.  I think that was in the second year of cooking.  Then I tried the sloppy joe recipe in my Better Homes and Gardens cookbook.  There are a few changes to the recipe; namely ketchup in place of tomato sauce.  It would be hard for me to make any other sloppy joes after enjoying this one.

The Ingredients:

  • 1 pound lean ground beef, or ground turkey
  • 1 splash of vegetable oil
  • 1/2 cup chopped onion (about 1 medium)
  • 1/2 cup chopped green pepper (1 small)
  • 1 cup of ketchup
  • 2 Tbsp. water
  • 1 to 1½ teaspoons chili powder
  • 1 teaspoon Worcestershire sauce
  • 1 teaspoon garlic salt
  • 1 cup of water
  • 6 kaiser rolls or hamburger buns

The Directions:

  1. In a large skillet cook the onion and green pepper in a splash of vegetable oil until tender.
  2. Add the meat to this and cook until completely browned.
  3. Drain the fat from the pan.
  4. Stir in the remaining ingredients, including the additional 1 cup of water.
  5. The additional cup of water allows you to simmer the mixture for about 15 minutes so the flavors can mesh and meld.
  6. Bring the mixture to a boil, reduce the heat and simmer for 10-15 minutes.
  7. Serve on toasted kaiser rolls or hamburger buns.
  8. Don’t forget to serve the potato chips on the side.  A little bit of sloppy joe on a bit of a potato chip is an amazing snack!

This is a great recipe to double or triple for a crowd.  (This is a Party House favorite recipe!)   A simple, easy to do week night recipe.  Or a great party crowd recipe, or a great let’s watch the baseball playoffs recipe!  (Is it October yet?)  Oh, and don’t forget if you’re serving sloppy joes and potato chips you must include the dill pickles.  Happy cooking everyone!

  • Subscribe to Blog via Email

    Enter your email address to subscribe to this blog and receive notifications of new posts by email.

    Join 1,175 other subscribers

Skip to toolbar