Tag Archive for Cook

The Grocery Paradigm Shift

grocery picFor many, many years our grocery budget always seemed so out of control.  Managing meals and buying groceries for a houseful was always a daunting but necessary task. Trying to keep the grocery budget under control and being able to  provide good meals for everyone was part of my weekly life mission for such a long time.

Now,  we fast forward to only one of our twenty-something’s left in the house with us.  Being minus a few bodies to feed is beginning to open up a whole,  new grocery shopping world.  This is a big deal for us because we had been so used to feeding an army for so, so long.  Particularly when the boys got to their teen years- Yikes!!

Pre-empty nesting,  lots and lots of ground beef or ground turkey was purchased.  Lately we have been eating a lot more steak, of the New York strip variety!!  Travel Man gets home from a trip and he likes to grill.  So of course we run over to the store for a couple of steaks.

Also, our hot dog menu has changed.  Pre-empty nesting,  I would only buy whatever hot dogs were on sale.  ( I’m on a budget here people). Now, since there are a few less bodies to feed I only buy Hebrew hot dogs.  These hot dogs used to be a “special ” treat for us because they are a little more expensive when you are feeding an army and trying to keep on a budget.  Do you realize how many hot dogs a family of seven can eat in one sitting?  The other reason we only buy Hebrews now  is that it is the only hot dog Travel Man will eat.  He has been working in the hot dog manufacturing plants.  Only all beef hot dogs  in our house.

We have also discovered that everything, and I do mean everything is better with butter.  For such a long time we bought the ginormous tubs of margarine at SAMs Club.  Nowadays we are buying the little tubs of butter, and I am cooking with butter all of the time.  Yum, yum so much more flavor in the food when you cook with butter.

At the rate we are going with buying ourselves the goodies we like,  the budget for groceries may not be dwindling anytime soon!!  Travel Man actually brought this to my attention in the past few days.

The one thing we are looking forward to is switching over to organic milk.  This is a silly little thing, and we would  probably be ok taking that plunge now.  But we do not want to go whole hog in our first month of The Great Grocery Shift.  We do need to leave a few food treats until the next month or so.  We should have some delayed gratification right?

These are just some simple, little changes with the groceries.  However,  they are noticeable and distinct changes.  I suppose for me because it is signaling a change in the times in our home.   A change of routine for sure, and a definitive change of lifestyle.  Kind of like a rite of passage.  We have made it  through the child-rearing years, and are coming full circle into a time all our own.

Have you ever Made Frosting with Flour?

I realized this week that I have neglected to post any recipes recently.  This is probably due to the party planning time, and actual parties in session over the past few weekends.  There is a recipe I have been meaning to share with everyone for a while now.  My Mom has a time-honored recipe for the best tasting frosting ever.

In our house this recipe is called “The Flour Frosting” recipe, and it goes something like this:

Ingredients:

  • 1 Cup Milk
  • 1/4 Cup Flour
  • 1/2 lb Margarine or Butter, softened
  • 1 Cup Sugar
  • 2 Tsp. Vanilla

Directions

  1. Mix the milk and flour together in a small saucepan on the stove. Cook on medium heat stirring constantly until thickened. Cool this mixture completely in the fridge.
  2. Beat the sugar and margarine together until creamy.  This is a critical step, the butter and sugar must be smooth and creamy in order for the frosting texture to be smooth and creamy.  There can be nothing grainy going on with the butter and sugar.  If this happens the frosting will look separated, and not taste very creamy.
  3. Add the cooled flour mixture to the butter and sugar, along with the vanilla.
  4. Beat until fluffy, and frost your cake!

This frosting is very creamy and extremely delicious, just a little warning.  It is not really the variety of frosting that you can do a lot of serious Wilton style decorating with.  But you will not be disappointed in the flavor and pure yummyness that this frosting delivers.

1-DSC012421-IMG_0093

These are my brothers’ birthday cakes from his last two birthdays, both covered with flour frosting.  This frosting is his favorite and he always requests it for his cakes.  It is one of my all time favorites too.

Yesterday I found a recipe similar to my Mom’s on the Tasty Kitchen.  This recipe is called, That’s the Best Frosting I’ve Ever Had.  This is quite similar to my Mom’s recipe, and goes into some additional detail on the mixing directions.

If you are making your someone special a delicious Valentine’s Day treat, try this recipe out.    If you have some cupcakes or a cake to bake this week, try this recipe out.  If you have some graham crackers lying around, and some of this frosting leftover you can put them together for a delicious treat.  You will not be disappointed.  Happy baking everyone.

The Great Family Pickle Experiment

IMG_0117-001Do you like pickles?  Are you a kosher dill person or a bread and butter pickles person?  Travel Man and I like the kosher, dill variety.  Yum, yum.  My Dad was the first one to make homemade pickles, over the summer.  His recipe uses a whey liquid to ferment the pickles in the refrigerator.  The first batch he made turned out spectacularly well.  They tasted great.  Good flavor, nice crunch.  He’s had some difficulties duplicating that first batch, and that inspired me to find my own recipe.  Oh and I forgot to mention I grew my own cucumbers too.  The baby plants survived a 108 degree heat, and we have had a nice crop of pickling cucumbers over the past few months.

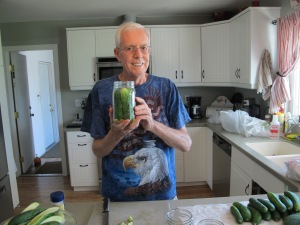
IMG_0149-001This is my Dad.  We made a big batch of pickles in my kitchen over the summer, and had quite an assembly line going.  Travel Man helped him get the cucumbers ready.  They measured all of the spices into the jars, added the whey liquid, and voila they were ready to go into the refrigerator.

This is my Dad’s recipe.  It has a kosher style flavor, and lots of crunch.

JIM’S DILL PICKLES

Makes 1 Quart

Ingredients: 

    • 6-8 Pickling cucumbers
    • 1 tablespoon mustard seeds
    • 1 clove garlic, chopped
    • 5-6 stalks of fresh dill, if in doubt, add more
    • 1 tablespoon sea salt
    • 4 tablespoons whey liquid
    • Filtered water-no chlorine!

Directions:

Wash the cucumbers to remove dirt. Cut into halves or quarters. Trim length, if necessary.  Add mustard seed and garlic to the quart jar.  Pack cucumbers tightly into the jar, adding dill as you go.  Mix the sea salt and whey liquid in 2 cups of water and pour over the cucumbers. Add water to cover the cucumbers, fill to about 1 in. below the top of the jar.  Seal the jar and invert once or twice to mix the liquid.

Keep at room temperature for 3 days and then store in the fridge. The pickles will be ready to eat in 3-4 weeks.

The whey liquid is made from yogurt. One large container will give you enough whey liquid for 4-6 jars.  Place a towel over a strainer and add the yogurt. The whey liquid will drip through slowly.  When it stops, tie up the towel loosely and let it drip some more. Once it stops, the milk solids  can be saved as cream cheese. This will keep for a week or 2 in the fridge.

This is a slow process, allow one day to produce the whey liquid. You can store it in a glass container in the fridge. It should keep for several months.

IMG_0004-001

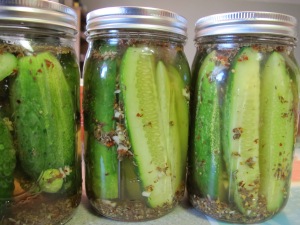
The recipe Travel Man and I used is from food.com.  These are our new favorite pickles.

Refrigerator Kosher Dill Pickles

Ingredients:

Pickling Liquid-

    • 1-1/2 cups water, boiled and cooled
    • 1 cup white vinegar, 5% acidity

For each quart jar add-

    • 1 tablespoon kosher salt
    • 2 tablespoons dill seeds
    • 1/4 tsp. celery seeds
    • 1 tsp. mustard seeds
    • 1 tsp. mustard flakes
    • 1 tsp. red pepper flakes
    • 1 bay leaf
    • 2 garlic cloves, minced
    • 3-6 cucumbers (depending on size)

Directions:

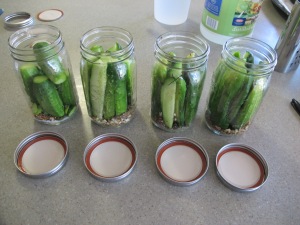
Add the salt and spices to each jar.  Add cucumbers sliced, whole (ends trimmed) or spears, packing them in tightly.  We also added the trimmed ends, and they made little pickles chips.  Fill the jar to within 1/2 inch of the top.  Add pickling liquid to cover the cucumbers.  Put a lid and a ring on the jar.  Shake the jar for a few seconds to distribute the salt and spices evenly.

Refrigerate the pickles for 7 days (Travel Man was opening them on the 4th day!).  Shake the jar for a few seconds everyday during the first 7 days to keep the salt and spices distributed.   The finished jars will last for approximately 6 months in the refrigerator.

IMG_0009-001IMG_0011-001

The one caution that I have about this recipe is watch out for the red pepper flakes.  They make the pickles quite spicy, and me being the spicy weenie that I am,  I could have done without them.  As a matter of fact our second batch had no red pepper flakes.  They were amazing.  Great flavor, good crunch.  I know I have mentioned that before, but they really taste so good.  The pickling cucumbers will definitely be a staple in the garden next year.  Our next adventure with the kosher dill recipe will be to make pickle chips, oh yum.  I will update you once those are completed.  Hopefully this week.

If your feeling adventurous, want to try a new recipe, and like pickles try one of these recipes.  You’ll be glad you did.  Remember each of these recipes is written for (1) one quart jar.  I had a lot of fun getting the cucumbers going in the garden, and then making some great pickles that Travel Man and my Dad enjoyed.  Most recently a jar went home with my sister to Montana.  This could become a nationwide phenomena.

This post linked to the GRAND Social

Chile Rellenos Casserole

One of my favorite recipes to materialize from my garden harvest this summer, was this recipe for a chile rellenos casserole from my Better Homes and Gardens cookbook.  It’s cheesy, got lots of flavor from the jalapenos, and super easy to throw together.  It’s a great dinner side dish, or it would make a wonderful casserole for a brunch.


Ingredients:

  • 2 Large, fresh poblano chile peppers, fresh Anaheim chile peppers or green sweet peppers (8 Oz)
  • 1 Cup shredded Monterey Jack cheese with jalapeno peppers or mexican blend cheese
  • 3 eggs, beaten
  • 1/4 cup milk
  • 1/3 cup all-purpose flour
  • 1/2 tsp. baking powder
  • 1/4 tsp cayenne pepper
  • 1/8 tsp salt
  • 1/2 cup shredded Monterey Jack cheese with jalapeno peppers or mexican blend cheese
  • Picante sauce (optional)
  • Dairy sour cream (optional)

Directions:

1) Pre-heat the oven to 450°.  Quarter the peppers and remove the seeds, stems and veins.

2) Submerge the peppers into boiling water for 3 minutes, and then drain well.  Turn them over and pat dry with paper towels.

3) Place the peppers in a well-greased 2 quart square baking dish, and top with 1 cup of the cheese.

4) In a medium bowl combine eggs and milk.  Add flour, baking powder, cayenne pepper, and salt.

5) Beat until smooth with a rotary beater.  Pour egg mixture over peppers and cheese.

6) Bake uncovered, for about 15 minutes or until a knife inserted into the egg mixture comes out clean.

7) Sprinkle with the 1/2 cup cheese, and let stand about 5 minutes or until cheese melts.

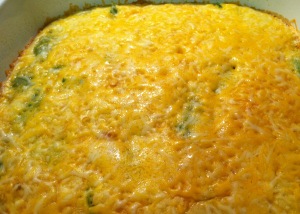
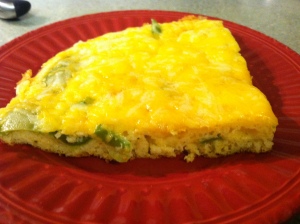
The finished product should look something like this:

Oh, so pretty with the green of the jalapenos peeking through the cheese.  I do have to say that you must remember that I am the “spice weenie” in our house.  So I only added half of the cayenne pepper that this recipe calls for.  Next time I make this I promised the family a “little” heat will be added to the mix!

What’s your favorite casserole dish?

Zucchini Pancakes

The zucchini harvest here at the Spindle Ranch is going gangbusters.  I had been perusing the allrecipes.com website and came across this recipe for a pancake with a twist.  This was a great breakfast pancake as it has the zucchini, onion, and my favorite, cheddar cheese.  You could add any variation that you please with this recipe.  Maybe add some green onion, or finely chopped jalapenos, or green peppers.  Travel Man suggested this would be a great pancake to eat with a couple of fried eggs on the side.


With your next harvest of zucchini try out this scrumptious recipe.

 Ingredients

  • 2 cups grated zucchini
  • 1 cup shredded Cheddar cheese
  • 1/2 cup grated onion
  • 2 eggs, beaten
  • 1 cup biscuit baking mix (such as Bisquick®)
  • 2 teaspoons vegetable oil, as needed
 

Directions

  1. Mix zucchini, cheddar cheese, and onion together in a bowl.
  2. Stir eggs and biscuit mix into zucchini mixture until well combined.
  3. Heat vegetable oil on the griddle or large skillet over medium heat.
  4. Scoop about 1/4 cup batter onto heated griddle. 
  5. Cook until pancakes are browned, 3 to 4 minutes per side.
  6. Repeat with remaining batter.

I did not take pictures when I made these, so my post is a little barren.  But I wanted to share this recipe with you, because it’s almost like an omelette and biscuit on your plate at the same time.  An easy, simple weekend breakfast kind of pancake.  Enjoy!

  • Subscribe to Blog via Email

    Enter your email address to subscribe to this blog and receive notifications of new posts by email.

    Join 1,175 other subscribers

Skip to toolbar