Archive for Food

Birthday Raspberry Cheesecake

2014-02-28 15.10.14
We had THE best raspberry cheesecake last month. My daughter, Hilary requested a cheesecake for her birthday celebration. Yes, I still take special requests for cakes, etc. on the birthday persons special day. More importantly Hilary asked if the cheesecake could be swirled with a raspberry sauce.

So being the dutiful mother that I am I went on an internet quest to find a great recipe that included raspberry sauce. The recipe for the raspberry cheesecake that I chose is posted at Just a Pinch Recipes.

This was the first time that I had made cheesecake with a homemade sauce to go along with it. The results were fantastic and there were raves and compliments all around the room. The cheesecake disappeared in a flash. If you want to try this cheesecake on your own here’s what you need to do.

Ingredients-

Crust:

1 cup graham cracker crumbs (about 1 package, finely ground in a food processor)

2 Tbsp. unsalted butter, melted

2 Tbsp. sugar

Raspberry Sauce:

2 Tbsp. sugar

6 oz. fresh raspberries

Filling:

32 oz. cream cheese, room temperature

1-1/2 cups sugar

pinch of salt

1 tsp. pure vanilla extract

4 large eggs, room temperature

Topping:

6 oz. fresh raspberries, for topping (optional)

powdered sugar, for dusting (optional

Directions:
1. Preheat oven to 350 F. Wrap exterior of a 9-inch springform pan (including base) in a double layer of foil; set aside.

2. Stir together cracker crumbs, melted butter, and 2 tablespoons sugar in a medium bowl. Press crumb mixture firmly onto bottom of pan.

3. Bake until set, about 10 minutes. Let cool in pan on a wire rack. Reduce oven temperature to 325 F.

4. While the crust is baking you can get started on your raspberry sauce. Process raspberries in a food processor until smooth, about 30 seconds. Pass puree through a fine sieve into a small bowl; discard solids. Whisk in 2 tablespoons sugar, and set aside.

5. Put the cream cheese in the bowl of an electric mixer fitted with the paddle attachment; mix on medium speed until fluffy, about 3 minutes.

6. With mixer on low-speed, add remaining 1-1/2 cups sugar in a slow, steady stream. Add salt and vanilla; mix until well combined.

7. Add eggs, one at a time, mixing each until just combined (do not over mix). Pour cream cheese filling over crust.

8. Drop raspberry sauce by the teaspoon on top. With a wooden skewer or toothpick, swirl sauce into filling. Keep swirling until you get a pattern/design that you are pleased with.

9. Bake the cake until it is set but still slightly wobbly in center, 60 to 65 minutes. (The recipe on Just a Pinch calls for the cake pan to be set in water for baking. I did not do this.)

10. Transfer cake pan to rack; let cake cool completely. Refrigerate, uncovered, 6 hours or overnight. Before unmolding, run a knife around edge of cake.

This recipe makes (1)  9-inch round cheesecake. You can garnish with fresh raspberries around the top of the cake if you like.
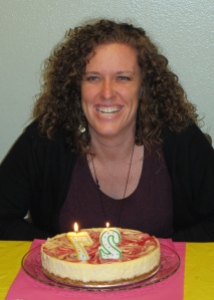
IMG_0023-002If you’ve never made a homemade cheesecake this recipe can seem a little daunting at first.  But just get busy and have fun making a delicious dessert.  My birthday girl was extremely happy with the results, and I’m sure this cheesecake will make an appearance at one of our family parties again very soon.

Pistachio Pudding Cake

In honor of St. Patrick’s Day here’s a great dessert you can whip up for the cake lovers in your family.  I posted this recipe last summer, and thought this would be a great time to share it again.

This cake recipe is a yummy little recipe that my Mom has made for me over the years for my birthday.  It’s one of the top 5 moist cakes around.  I imagine that you could use other flavors of cake mix and pudding mix to change it up, but my favorite has always been the pistachio flavor.  Not everyone loves the pistachio flavor like I do, but I have to say everyone at my house tried it and liked it.

For the Cake:

  • 1 box pineapple or lemon flavored cake mix
  • 1 30z box of pistachio instant pudding
  • 4 eggs
  • ½ c. vegetable oil
  • 1 c. cold water

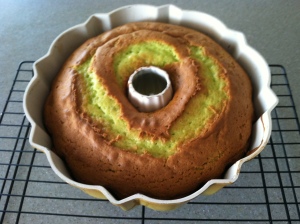
Mix all of the ingredients well  and pour into your favorite angel food or bundt pan.  Grease the pan first.  Bake at 350º for 5o minutes.  Let this cool on a wire rack, and then remove from the pan on to a plate for frosting and serving.  If you have the time,  refrigerate the cake overnight before frosting.  This will keep the cake really, really moist.

Baked Cake – Cooling

For the Frosting:

  • 1 3oz. box of pistachio instant pudding
  • 1 pkg of Dream Whip
  • 1¼ cups of milk

Beat all of the ingredients well.  The frosting mixture should form small peaks, just like a whip cream style frosting.  Frost the cooled cake and refrigerate or serve immediately for your eating pleasure.

And don’t forget the milk or coffee to go along with it. This is a great summer time cake.  The frosting is light, and the cake is moist.  This was a welcome home treat for my Travel Man, and it did not last long.  A great recipe to pass along.  Thanks Mom!

Lemon Poppy-Seed Cookies

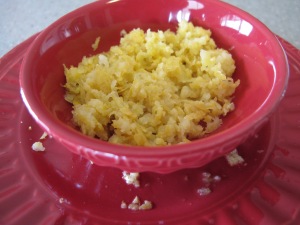
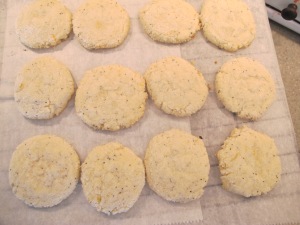
1-IMG_0028Since we have a plethora of lemons around here, from our lemon/lime tree, I have been searching for new cookie recipes to try out on the cookie lovers at my house.  Last week I tried out this easy recipe for lemon poppy-seed cookies, from the Martha Stewart website.  I did add an additional cup of flour from the original recipe, as the dough was extremely sticky.  This was a trial run for this recipe, and they turned out ever so delicious.  I will definitely be adding these to my cookie recipe arsenal.

Ingredients:

  • 1/4 cup fresh lemon juice
  • 3 ½ teaspoons freshly grated lemon zest (2 to 3 lemons)
  • 8 ounces (2 sticks) unsalted butter
  • 3 cups all-purpose flour
  • 1 teaspoon baking powder
  • 1/2 teaspoon salt
  • 1 ½cups sugar
  • 1 large egg
  • 2 teaspoons pure vanilla extract
  • 1 tablespoon poppy seeds, plus more for sprinkling

Directions:

1. Preheat oven to 375 degrees. Bring lemon juice to a simmer in a small saucepan medium heat; cook until reduced by half. Add 1 stick butter; stir until melted.

3-IMG_0034

2.  In a large bowl, whisk together flour, baking powder, and salt.

3. Cream remaining stick butter and 1 cup sugar.  Mix in egg and lemon butter. Mix until pale, about 3 minutes.

4. Mix in vanilla and 2 teaspoons zest. Mix in flour mixture and poppy seeds.

5. In a small bowl, stir together remaining 1/2 cup sugar and 1½ teaspoons zest.

2-IMG_00315-IMG_0038

6. Roll spoonfuls of dough into 1½-inch balls or use your favorite cookie scoop; roll them in sugar mixture. Place 2 inches apart on baking sheets.

4-IMG_0037

7. Press each with the flat end of a glass dipped in sugar mixture until ¼ inch thick. Sprinkle with extra poppy seeds.(This is optional)

8. Bake until just browned around bottom edges, 10 to 11 minutes. Transfer to wire racks; let cool completely. Makes about 30 cookies.  Store in an airtight container up to 1 week.

6-IMG_00397-IMG_0040

This cookie is like a little,  lemon shortbread.  It has definitely gotten better with age, and oddly enough we still have a few left in the cookie container.  Amazing!  This is a great recipe to make to send to long distance loved ones, or for your favorite Travel Guy to take with him on his next trip.  Come on over and pick some lemons from our tree and try out the recipe.  Next on my lemon cookie list will be good ‘ol Lemon Squares.  Happy baking everyone!

A Sweet Little Valentine Dessert

Yes it’s a few days after Valentine’s Day, but I wanted to share our sweet dessert with you all.  Travel Man was lucky enough to be home for this Valentine’s Day, and cooked me a great dinner that included steak, shrimp, au gratin potatoes, and green beans.  A yummy treat.  The food was great, and I’m sure tasted so good because  I took a back seat in the kitchen.  Travel Man made the dinner, and I made the dessert.  A great team effort.

1-IMG_0062-001

Our dessert was some brownies I baked from a box mix.  I watched the pan carefully while it was baking because I wanted the brownies to turn out extra ooey and gooey.  And they did.  I made these in the morning right after breakfast so they had plenty of time to be completely cooled.

For serving, I dug out my little heart-shaped cookie cutter and  sculpted the brownies that you see here on the plates.  Then we added some creamy, delicious, french vanilla ice cream, and enjoyed a sweet dessert feast.  Just a simple little dessert made with love, and lots of  chocolatey goodness.

Did you bake any special treats for your Valentine?

Have you ever Made Frosting with Flour?

I realized this week that I have neglected to post any recipes recently.  This is probably due to the party planning time, and actual parties in session over the past few weekends.  There is a recipe I have been meaning to share with everyone for a while now.  My Mom has a time-honored recipe for the best tasting frosting ever.

In our house this recipe is called “The Flour Frosting” recipe, and it goes something like this:

Ingredients:

  • 1 Cup Milk
  • 1/4 Cup Flour
  • 1/2 lb Margarine or Butter, softened
  • 1 Cup Sugar
  • 2 Tsp. Vanilla

Directions

  1. Mix the milk and flour together in a small saucepan on the stove. Cook on medium heat stirring constantly until thickened. Cool this mixture completely in the fridge.
  2. Beat the sugar and margarine together until creamy.  This is a critical step, the butter and sugar must be smooth and creamy in order for the frosting texture to be smooth and creamy.  There can be nothing grainy going on with the butter and sugar.  If this happens the frosting will look separated, and not taste very creamy.
  3. Add the cooled flour mixture to the butter and sugar, along with the vanilla.
  4. Beat until fluffy, and frost your cake!

This frosting is very creamy and extremely delicious, just a little warning.  It is not really the variety of frosting that you can do a lot of serious Wilton style decorating with.  But you will not be disappointed in the flavor and pure yummyness that this frosting delivers.

1-DSC012421-IMG_0093

These are my brothers’ birthday cakes from his last two birthdays, both covered with flour frosting.  This frosting is his favorite and he always requests it for his cakes.  It is one of my all time favorites too.

Yesterday I found a recipe similar to my Mom’s on the Tasty Kitchen.  This recipe is called, That’s the Best Frosting I’ve Ever Had.  This is quite similar to my Mom’s recipe, and goes into some additional detail on the mixing directions.

If you are making your someone special a delicious Valentine’s Day treat, try this recipe out.    If you have some cupcakes or a cake to bake this week, try this recipe out.  If you have some graham crackers lying around, and some of this frosting leftover you can put them together for a delicious treat.  You will not be disappointed.  Happy baking everyone.

  • Subscribe to Blog via Email

    Enter your email address to subscribe to this blog and receive notifications of new posts by email.

    Join 1,175 other subscribers

Skip to toolbar