Archive for Food

Oh I had fun making Cinnamon Rolls

1-IMG_0099

Now I know everyone is busy this week setting goals for the new year, maybe trying to cut back on the sweet treats and what you are eating, but the next time you have a sweet tooth and need a great sweet treat, you need to try this recipe.

Over the holidays I created the cinnamon roll recipe from my Pioneer Woman cookbook.  Oh and what fun I had.  I’m  pretty sure this was the last treat I put together for my 2012 Christmas baking season.  First of all you need to understand the I am a bread-head.  I love anything breadalicious.  Bread, rolls, French bread, sweet breads. ,yum, yum.

I actually haven’t made anything along the lines of a bread recipe since October when we had a homemade pizza party.  So I gathered the ingredients, made the dough as directed, and voila here’s what it looked like after is had risen for about an hour.  Beautiful isn’t it?

1-photo-001Whenever I see a bowl full of poofy dough like this I just want to punch it down and smell the sweet bread flavors, and I did.

Next was rolling out the dough into a semi-rectangle, and adding the toppings.  butter, cinnamon, sugar, butter, cinnamon, sugar.  It was wonderful.

1-IMG_0084

1-IMG_00851-IMG_0088

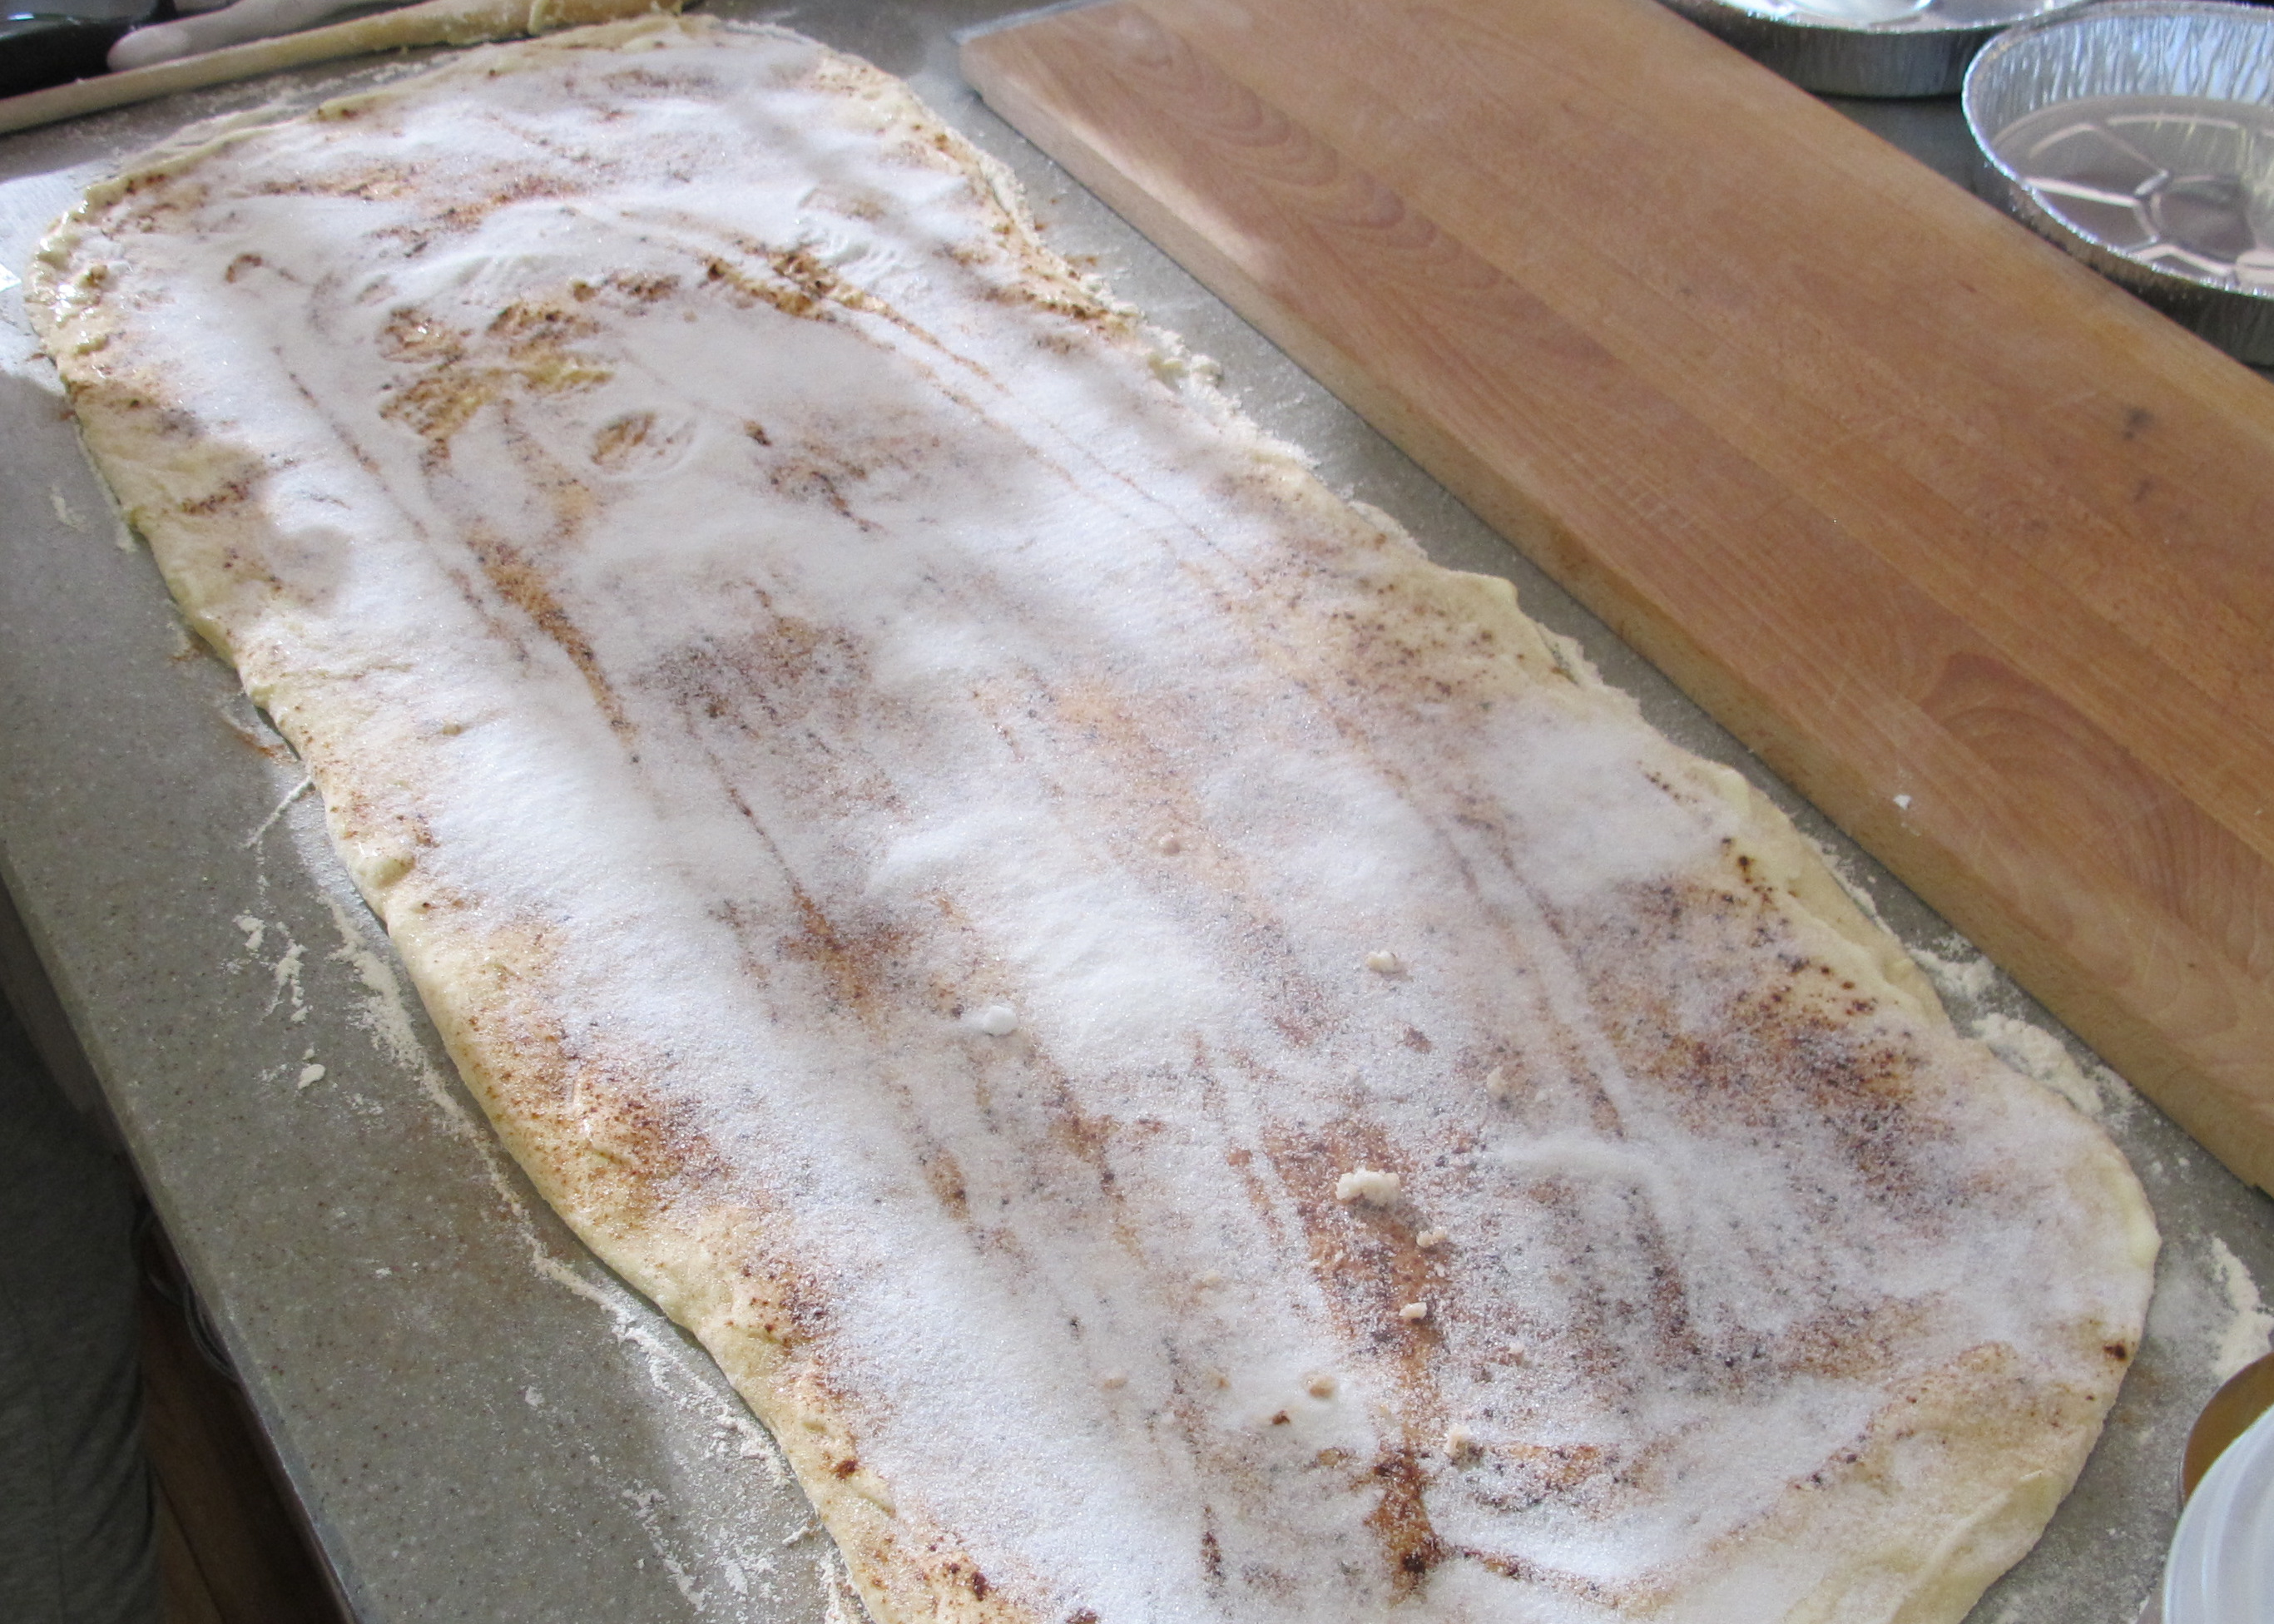
Then came “The Roll”!!  Starting at one end and rolling as tightly as you can, but uniformly until you end up with your rectangle of dough looking like this…

1-IMG_00911-IMG_0092

This recipe makes two long rectangles for the cinnamon rolls.  The first rectangle I rolled was a little bit loose, and I probably could have rolled slightly tighter.  By the second rectangle I had my system in order and it turned out great.

Then you cut the rolls, place them into your baking pans, and let them rest and rise again.  I used foil pans, since most of these were going to friends and family for a Christmas treat.

1-IMG_00941-IMG_0098

Once they rested, they go into the oven for 20 minutes, frost and you are ready for some seriously sweet noshing.  But make sure you include a good cup of coffee with your treat.  Then it becomes spectacular.

I had so much fun rolling the dough and putting the rolls together.  The texture of this dough was fantastic, and made the assembly process all the easier.

My taste testers here at the house have proclaimed that this recipe must be a new Christmas tradition.  I agree.  I will add this to my annual Christmas baking arsenal for many years to come.

What’s your favorite baking recipe?

>> Photo credit for this post goes to my Travel Man…

The Most Popular Revelings Post for 2012

This recipe was posted over the summer months, and it has been the most popular post on my site for this year.  If you missed out on the taco yumminess you may want to give this one a try.  It’s definitely a great recipe for anytime of the year.  Enjoy!

Taco Salad for a Crowd – Originally posted in May 2012

For the past two or three days it has been over 90 degrees here in So Cal, just a hint of summertime coming our way.  The hot weather calls for some lighter and yummy dinners.  Tonight I made the gang a  Taco Salad.  I called my Mom to find out the origin of this recipe, and we came to the conclusion that I was a recipe that was passed around the neighborhood when we were growing up.  However, I have put my own twist on the recipe, with the help of my daughter Naomi.

Ingredients:

  • 1 lb. ground turkey or ground beef (whichever you prefer)
  • 1 can of kidney beans (15 oz)
  • 1 pkg of taco seasoning
  • 1 bag of fritos (10½ oz)
  • shredded cheese (we like the cheddar & monterey jack combo)
  • shredded cabbage
  • tomatoes
  • green onion

Directions:

  • Brown the meat, and drain off the grease.
  • Drain the beans and add them to the browned meat.  I like to do this to heat up the beans.
  • Mix in the taco seasoning and the amount of water that is called for on the package.
  • Simmer this mixture until you have cooked off almost all of the liquid.
  • While the meat is simmering;
  • Chop up the tomatoes
  • Chop up some green onions.
  • Chop the shredded cabbage into smaller bite size pieces.
  • Crush the fritos, in the bag, with a rolling-pin.  Open the bag a bit first though to let out the air.
                                                         Salad Layers

For the salad assembly: 

  • The layering effect is Naomi’s twist on the recipe.
  • In a large glass bowl layer the ingredients like this:
  • Fritos
  • Meat and beans
  • Cheese
  • Shredded cabbage
  • Tomatoes
  • Green Onion
  • Then repeat the layers for a second time.
  • You can either serve the salad layered, or if your adventurous like me you can toss the whole salad and serve.
  • For garnishments put out your favorite salsa, sour cream, and black olives (that’s ones for you Hilary!)

Variations:

  • This recipe can easily be made with shredded chicken or beef.
  • You could add additional cans of different types of beans (black or pinto).
  • You could flavor the meat with your favorite salsa instead of taco seasoning.
  • Any garnishments that you like can easily be put on top or served with your salad on the side.

This is truly a yummy recipe, and so easy to throw together.  Oh and I like using the shredded cabbage because it does not get soggy at all.  I put out the cabbage when we have just plain old tacos in the shell too.  For this twenty-something household, this salad makes a great big meal and is great for staying on budget.  If you’ve never made this before it’s a real treat.  If you haven’t made it in a while you’ve been missing out like me.  I’m definitely mixing this recipe in with my weekly summertime meal planning.

Are you Ready?

1-IMG_0076

Presents wrapped, cookies all baked?  Are you ready for tonight and tomorrow?

I have been working on lots of crafts, and baking.  I really can’t share any of my crafting goodies with you all until after Christmas Day.  I don’t want to give away any secrets you know.

My favorite cookies to bake are always sugar cookies, and spritz.  Love the buttery deliciousness of both of these cookies.  The recipes that I use are from a Betty Crocker cookie book.

Nana Joan’s Sugar Cookie-

* This is a recipe that we cooked growing up.  Always a favorite at Christmas time.

Ingredients:

  •  3/4 c. shortening (use part margarine or butter)
  • I highly recommend using only butter.  Butter makes everything better!
  • 1 c. sugar
  • 2 Eggs
  • 1 tsp. vanilla
  • 2-1/2 c. flour
  • 1 tsp. baking powder
  • 1 tsp. salt
Directions:
  •  Mix shortening, sugar, eggs, and flavoring.  Beat until creamy.  
  • Add remaining ingredients and mix thoroughly.
  • Chill the dough for at least 4 hours.
  • For painting the cookies before baking use evaporated milk and food coloring.
  • Bake at 400 degrees on ungreased cookie sheets.
  • Baking time is 6-8 minutes

And the recipe for the Spritz cookie which require a cookie press go like this-

1-DSC01107Spritz Cookies

Ingredients:

  • 1 C. butter or margarine, softened (I recommend butter only!)
  • 1/2 c. sugar
  • 2-1/4 c. all-purpose flour
  • 1 egg
  • 1/4 tsp. almond extract or vanilla

Directions:

  • Heat oven to 400.
  • Mix margarine and sugar in large bowl.
  • Stir in remaining ingredients.
  • Chill the dough for a few hours.
  • Place dough in cookie press, and form desired shapes.
  • Decorate with colored sugar or candies.
  • Bake on ungreased cookie sheets for 5-8 minutes until set but not brown.
  • Immediately remove from cookie sheet.
  • Makes 6-7 dozen cookies.
  • Freeze any extras if you have them.  These freeze well.
  • Great cookie to mail for the holidays.

Oh,  and this is what my sweet baby granddaughter was doing while her mother and I baked our little hearts out last week.

1-IMG_0079

Wishing you and yours the Merriest of Christmas seasons.  I hope each and every one of you has a splendid time with your families near and far.

The Great Family Pickle Experiment

IMG_0117-001Do you like pickles?  Are you a kosher dill person or a bread and butter pickles person?  Travel Man and I like the kosher, dill variety.  Yum, yum.  My Dad was the first one to make homemade pickles, over the summer.  His recipe uses a whey liquid to ferment the pickles in the refrigerator.  The first batch he made turned out spectacularly well.  They tasted great.  Good flavor, nice crunch.  He’s had some difficulties duplicating that first batch, and that inspired me to find my own recipe.  Oh and I forgot to mention I grew my own cucumbers too.  The baby plants survived a 108 degree heat, and we have had a nice crop of pickling cucumbers over the past few months.

IMG_0149-001This is my Dad.  We made a big batch of pickles in my kitchen over the summer, and had quite an assembly line going.  Travel Man helped him get the cucumbers ready.  They measured all of the spices into the jars, added the whey liquid, and voila they were ready to go into the refrigerator.

This is my Dad’s recipe.  It has a kosher style flavor, and lots of crunch.

JIM’S DILL PICKLES

Makes 1 Quart

Ingredients: 

    • 6-8 Pickling cucumbers
    • 1 tablespoon mustard seeds
    • 1 clove garlic, chopped
    • 5-6 stalks of fresh dill, if in doubt, add more
    • 1 tablespoon sea salt
    • 4 tablespoons whey liquid
    • Filtered water-no chlorine!

Directions:

Wash the cucumbers to remove dirt. Cut into halves or quarters. Trim length, if necessary.  Add mustard seed and garlic to the quart jar.  Pack cucumbers tightly into the jar, adding dill as you go.  Mix the sea salt and whey liquid in 2 cups of water and pour over the cucumbers. Add water to cover the cucumbers, fill to about 1 in. below the top of the jar.  Seal the jar and invert once or twice to mix the liquid.

Keep at room temperature for 3 days and then store in the fridge. The pickles will be ready to eat in 3-4 weeks.

The whey liquid is made from yogurt. One large container will give you enough whey liquid for 4-6 jars.  Place a towel over a strainer and add the yogurt. The whey liquid will drip through slowly.  When it stops, tie up the towel loosely and let it drip some more. Once it stops, the milk solids  can be saved as cream cheese. This will keep for a week or 2 in the fridge.

This is a slow process, allow one day to produce the whey liquid. You can store it in a glass container in the fridge. It should keep for several months.

IMG_0004-001

The recipe Travel Man and I used is from food.com.  These are our new favorite pickles.

Refrigerator Kosher Dill Pickles

Ingredients:

Pickling Liquid-

    • 1-1/2 cups water, boiled and cooled
    • 1 cup white vinegar, 5% acidity

For each quart jar add-

    • 1 tablespoon kosher salt
    • 2 tablespoons dill seeds
    • 1/4 tsp. celery seeds
    • 1 tsp. mustard seeds
    • 1 tsp. mustard flakes
    • 1 tsp. red pepper flakes
    • 1 bay leaf
    • 2 garlic cloves, minced
    • 3-6 cucumbers (depending on size)

Directions:

Add the salt and spices to each jar.  Add cucumbers sliced, whole (ends trimmed) or spears, packing them in tightly.  We also added the trimmed ends, and they made little pickles chips.  Fill the jar to within 1/2 inch of the top.  Add pickling liquid to cover the cucumbers.  Put a lid and a ring on the jar.  Shake the jar for a few seconds to distribute the salt and spices evenly.

Refrigerate the pickles for 7 days (Travel Man was opening them on the 4th day!).  Shake the jar for a few seconds everyday during the first 7 days to keep the salt and spices distributed.   The finished jars will last for approximately 6 months in the refrigerator.

IMG_0009-001IMG_0011-001

The one caution that I have about this recipe is watch out for the red pepper flakes.  They make the pickles quite spicy, and me being the spicy weenie that I am,  I could have done without them.  As a matter of fact our second batch had no red pepper flakes.  They were amazing.  Great flavor, good crunch.  I know I have mentioned that before, but they really taste so good.  The pickling cucumbers will definitely be a staple in the garden next year.  Our next adventure with the kosher dill recipe will be to make pickle chips, oh yum.  I will update you once those are completed.  Hopefully this week.

If your feeling adventurous, want to try a new recipe, and like pickles try one of these recipes.  You’ll be glad you did.  Remember each of these recipes is written for (1) one quart jar.  I had a lot of fun getting the cucumbers going in the garden, and then making some great pickles that Travel Man and my Dad enjoyed.  Most recently a jar went home with my sister to Montana.  This could become a nationwide phenomena.

This post linked to the GRAND Social

10 Things I Loved About Visiting Montana

View of the backyard.

A week or so ago Travel man and I had the opportunity to visit my sister and her husband near Missoula, Montana.  The countryside there was breathtaking.  Mountain ranges all around us, and a beautiful valley of rolling hills and farmlands.  It has been way too long since I have been at my sister’s house, and Travel man’s never been there.  We encountered some rain, some snow, and a few rays of sunshine too.  The property where my sister lives is very wooded, and right at the base of the Bitterroot Mountain range.  Gorgeous, gorgeous views.  Unfortunately it was too cloudy for pictures while we were there.


So, in honor of our visit I have put together my top ten list from our  Montana travels.

  1. Sleeping for 8-9 hours at a stretch this is unheard of for me!!  I normally sleep may 6 hours a night?  I was told that this could have been due to the altitude change.  I think it’s because The air was so crisp and cool, and I was so relaxed.
  2. Leaferville – we got to see the changing of the leaves the moment we landed in Spokane.
  3. Crisp, crisp cool weather.  Highs in the 40’s, lows in the 20’s.  It was glorious.
  4. Snow??  Who knew!  We drove through a snow storm on our drive from Spokane to Missoula.  It’s been a long time since I’ve seen snowflakes so big.
  5. My sister’s cooking – Wow!!  Laura is a gourmet cook.  We had a Lentil, Beef Stew, homemade coq au vin, and a delicious Butternut Squash Soup.  Wonderful, warm delicious meals.  Absolutely yummy!
  6. Celebrating the “baby steps” of a major home improvement project.  Laura and her husband are having their roof worked on.  It’s been very stressful for them, and we helped them to celebrate the small victories of the project moving forward.
  7. Wearing blue jeans, and socks and shoes.  Changing up the wardrobe.  Instead of the usual crop pants and tank top wardrobe!  Oh and I did get to wear the scarf my mom made me too!
  8. Sipping hot coffee and lattes on a chilly Montana morning next to the wood stove.  Can you say mega comfort zone?
  9. A couple of gaggles of wild turkeys roaming in the front yard.
  10. Some cute little dear nibbling on some brush,  also in the front yard.

These are just a few of my favorite moments from our trip.  Of course I delighted in the non-top chatting with my sister.  She is definitely a mountain girl, and loves living the country lifestyle.  Maybe I’m just a smidge jealous on that front.  We did have a wonderful time together, and lucky me my sister’s coming to my house for a visit this week.  Just makes me want to jump for joy.  Wishing everyone a great week.

What’s your recent, favorite family moment?

  • Subscribe to Blog via Email

    Enter your email address to subscribe to this blog and receive notifications of new posts by email.

    Join 1,175 other subscribers

Skip to toolbar