Archive for Around the House

The Tomatoes are Growing

Hello neighbors.  Yes I’m still here and no I haven’t gone anywhere.  You see Travel Man got home from his second international trip last Saturday, and we’ve been spending some much-needed time together.  He’s only been home 8 days in the last 30, and now he’s home all of this week (anxiously keeping my fingers crossed).  We’ve been having some great meals together, and working in the garden together.  Always a lot to do in the garden.

This year I planted 5 tomatoes plants.  The varieties I purchased from Lowe’s and Home Depot were; Roma, Better Boy, Big Boy, and Celebrity.  A pretty ambitious effort for me, because at the end of last summer I had proclaimed I would only plant two tomato plants this year.  I’m crazy like that, sometimes I just like to go for the gusto!  So I had intended to share these pictures with all of you about a month ago, and somehow they got lost in the “Camp Grandma” menagerie of pictures.

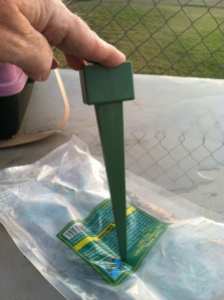
This little contraption is what I am using to water the tomatoes this summer.  Of course in Southern California we have some extreme heat in the summer.  Travel Man found these for me at one of his favorite hardware stores, and I was readily willing to try them.  The spike holds a two liter soda bottle.  It has little holes down each side of the spike to allow the water to flow through to the roots.  With the heat we are having right now I am filling the bottles up twice a day.  In the morning and again in the early evening.  So far so good as the tomatoes are thriving.

This picture of the Roma tomato plant is from a month ago.


And this is the same plant today.  I finally added the cages and staking to all of the tomato plants last weekend.  Now it’s just keeping up with the watering and weeding, and waiting for the arrival of the first tomato!!  I cannot wait to have my first BLT with a garden tomato!
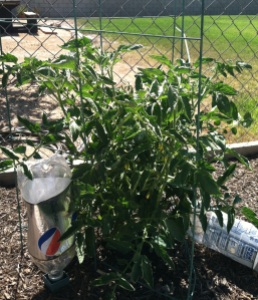
We (meaning Travel Man and I) are having an ongoing discussion about the best way to let the tomatoes grow.  My mindset has always been to just put the cages up and let them go to town.  Travel Man’s theory is we should keep them pruned inside of the cages to get a better crop of tomatoes.  I am trying it Travel Man’s way this summer, so I can see how the plants to in the raised bed they are growing in.  And I have to give his idea a chance too.  I like to try to see things from all sides, and not be the “fathead”.  So that being said it brings me to my question for all of you who garden or have gardened in the past.  “To prune the tomatoes, or not prune the tomatoes?”   That is my question to all of you.  Looking forward to hearing some great gardening opinions.  Happy Wednesday to everyone!

Have you used a Playdough Launcher?

It’s that Camp Grandma time of the week for me.  Evan’s summer vacation days are numbered and he will be back in school in about 3 short little weeks.  Where oh where does the time go?

Today my little camper did not really want to partake in any of the activities I was suggesting for him.  We painted some markers for the garden and we’ll finish those up tomorrow.  He really wasn’t interested in anything else except what time we were going swimming.

I was working on organizing my sewing and crafts shelves, and Evan got out the PlayDough.  About 15 minutes after he got started in the kitchen I went to see what he was up to.  It was a little too quiet for these Grandma ears.  I walked into this.

Evan had taken each of the colors he has, I think there must be seven or eight, and rolled it into a big ball.  They looked like dumplings!  Then he got out the plastic basket, and the soup ladle. 

This is a very serious sport people!

According to the PlayDough Launcher aficionado, you take the ball of PlayDough, put in on the spoon, and launch it to the other end of the room to find out how far it will go.  Oh and if it goes under any furniture it doesn’t count. 

A simple but entertaining way to spend the morning, and so creative to boot.  I was cracking up when he made this serious face for the picture.   And for those of you out there who have boys, it’s just a “boy thing”.  Build something and see how it works!  The next time you’re bored and looking for something fun to do just get out your PlayDough.

Birthday Cheesecake – New York Style

For my son, Zach’s,  21st birthday he requested a cheesecake, a baked cheesecake,  the rich and yummy kind.  Well there’s no better recipe than a New York style cheesecake.  While at Sam’s Club doing my birthday party shopping I picked up a 3lb box of cream cheese. And lo and behold there was a recipe for New York style cheesecake right on the side of the box, so I did not have to go any further for the recipe. 

Gather your ingredients:

  • 1c. graham cracker crumbs
  • 3 Tbsp. sugar
  • 3 Tbsp. butter or margarine, melted
  • 2½ lb. cream cheese, softened
  • 1 c. sugar
  • 3 Tbsp. flour
  • 1 Tbsp. vanilla
  • 1 c. sour cream
  • 4 eggs
  • Fresh fruit or (1) can of pie filling for the topping

Then follow these simple directions:

  • Preheat the oven to 325º.  Find your silver 9-inch springform pan.  Look in the back of your cupboard, this is not one you use all of the time.  If you are using a dark, non stick pan reduce your oven temperature to 300º.
  • For the graham cracker crust: Mix crumbs, 3 Tbsp sugar,  and melted butter together in a small bowl with a fork.  The mixture will be crumbly.  Press the crumb mixture into the bottom of the springform pan, and a little bit should press up the sides of the pan.  About  ½ an inch up the side of the pan.  Bake this for 10 minutes.
  • Beat the cream cheese, 1 c. sugar, flour and vanilla with electric mixer on medium speed until well blended.  Add sour cream, mix well.  Add eggs, 1 at a time, mixing on low-speed after each just until blended.  Pour this mixture over the crust.
  • Bake 1 hour 10 minutes or until center is almost set.  Cool cake, and then refrigerate in the pan overnight to be sure the cheesecake is completely set.  To remove from the pan, run a knife or metal spatula around rim of pan to loosen the cake.  Top with fresh fruit or pie filling before serving. 

For the topping on this birthday cheesecake, the birthday boy requested fresh raspberries.  They are in season right now and were delicious.  You could also used a canned pie filling or any other fresh fruit of your choice.  This recipe make enough cheesecake to serve 16 slices.  It is a very rich cake, and will be all the rave at your next party.  If you haven’t made a baked cheesecake in a while this is a great “go-to” recipe for a yummy, delicious dessert.

**Photo credit to Elaine Zee for the lovely cheesecake pic.  Thanks Elaine!

Find a Container and Garden

One of my favorite ways to dress up my patios in the summertime is with containers of plants and flowers.  Big pots, small pots, any size at all pots.  I love to have the flowers all around on the patios.  Last week before the 4th holiday I was replanting all of my big flower pots on the patio.  I thought I would share my process as it’s really simple, and a great way to spruce up your patio for summer time, spring time, fall time, or anytime at all time.

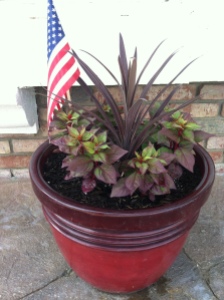
I had two big red planter pots that were on my front patio.  And they had been empty for a while, so I decided this was the week to replant.  These are plastic pots so they’re very lightweight.  It’s very easy to find the lightweight pots these days.  All of the home improvement stores carry them, and at Wal-Mart the bigger pots are especially budget friendly.


So, take your big empty pot, and add some empty water, or soda bottles, and fill the pot about 1/3 to 1/2 of the way full.  I saw  this trick on one of the home improvement shows, and filed it in my list of things to remember.  This makes the big pot so much lighter when you are finished.  If your twenty-somethings aren’t around you can lift this one by yourself.   And with this method you save some money on potting soil too.

Next cut a piece of weed cloth and lay it on top of the layer of bottles. This  will contain the potting soil.  Then add your potting soil and fill the pot to the top.

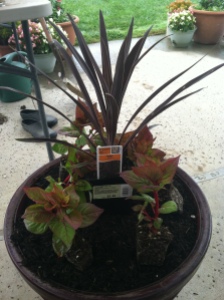
Now it’s time to select your plants.  For this pot I chose the tall spiky plant in the middle first.  This is called a Cordyline.   I picked this one for the great color on the leaves.  Just the color I was looking for.  Then I found the flowers to surround them.  This plant is a Celosia.  It will get yellow and red flowers.  I choose this one for the colors in the leaves too.  Just love the vibrant greens.   I set the plants on top of the dirt first to get my arrangement just right.

Now it’s time to get everything planted in the pot, and water generously to get all of the plants settled in the dirt. Move the beautiful pot to its new home and enjoy!!  I like to use annuals in all of my pots so I can change them out for each season.  It’s a great way to add color to your patio.

Have you tried any container gardening lately?


Wow 125 posts on WordPress!

You published 125 posts

Goal of 125 Posts Completed. Congratulations!

Hello friends.  This is the message that popped up on WordPress when I finished my post on the Zucchini Bandit!  I’m so excited!!  I’ve been blogging since last August, so I’m coming up on a year of blogging adventures.  It’s been quite an adventure for me.  Learning about  the world of blogging.  Discovering that I enjoy telling my stories, and sharing my tales.  This whole experience  has been completely and utterly enjoyable for me.

I’m looking forward to continuing my storytelling, and adventure writing.  For we all know that life is an adventure all on its own.  Thanks to all of my faithful followers for coming along on my family’s journey. 

One of my favorite quotes by Ralph Waldo Emerson- “Life is a journey, not a destination.”


  • Subscribe to Blog via Email

    Enter your email address to subscribe to this blog and receive notifications of new posts by email.

    Join 1,175 other subscribers

Skip to toolbar